Sunday, June 30, 2013

Good Chocolate Muffin Morning!

Today is the LAST day of our comment contest, so if you want a chance to win something home-baked from me (I ship!) be sure to comment on this or any post by midnight tonight, June 30, 2013!

For this last day of June I'm bringing you something very special: Chocolate Breakfast Muffins! I found the recipe on the King Arthur Flour site, and the reviews were phenomenal, so I was just bursting at the seams to make them! I realized, late last night, that I had all of the ingredients. So, there I was, at 11:30 at night, mixing up the batter (just stirred together, no mixer necessary) and popping them in the oven. The timer announced they were done just after midnight, and it was all I could do not to dig right in to one. I mustered up the little bit of self-control still remaining and set them out to cool, then loaded up the dishwasher, and called it a night.

So here we are this morning, with a dozen of the most beautiful chocolate muffins you can imagine. They are substantial -- dense, firm, moist -- and crowned with a sparkling of coarse sugar. I've never actually had a chocolate muffin before, but this recipe is a home run and I'll be making them again for special breakfasts or brunch. They are not too sweet and yet pack a real chocolate punch. I could go on and on about how happy I am with this recipe. Try it, and see for yourself. You'll have a new keeper for your recipe collection, I'm sure!

CHOCOLATE BREAKFAST MUFFINS
recipe that follows is from King Arthur Flour

Oven, 350 degrees F

2/3 cup Dutch processed cocoa
1 3/4 cups unbleached all-purpose flour (King Arthur!)
1 1/4 cups light brown sugar
1 teaspoon baking powder
3/4 teaspoon espresso powder (optional)
1 teaspoon baking soda
3/4 teaspoon salt
1 cup chocolate chips
2 large eggs
3/4 cup milk
2 teaspoons vanilla
2 teaspoons vinegar
1/2 cup butter, melted OR 1/3 cup vegetable oil
coarse white or pearl sugar for topping (optional)

Preheat the oven to 350 degrees Farenheit. Line a standard muffin pan with paper or silicone muffin cups, and grease the cups (I didn't grease the paper liners, just put them in the ungreased muffin pan).

In large mixing bowl, whisk together the cocoa, flour, sugar, baking powder, espresso powder, baking soda, salt, and chocolate chips. Set aside.

In a large measuring cup or medium-sized mixing bowl, whisk together the eggs, milk, vanilla, and vinegar. Add the wet ingredients, along with the melted butter, to the dry ingredients, stirring to blend; there's no need to beat these muffins, just make sure everything is well-combined.

Scoop the batter into the prepared muffin tin; the cups will be heaped with batter, and the muffin will bake into a "mushroom" shape. Sprinkle with pearl sugar if desired.

Bake the muffins for 20-25 minutes (mine went for 25 minutes) or until a cake tester inserted in the center of a muffin comes out clean. Remove the muffins from the oven, and after 5 minutes remove them from the pan, allowing them to cool for about 15 minutes on a rack before peelig off the muffin papers or silicone cups. Yield:  12 muffins


KAF nutrition info per serving (1 muffin, 101g): 335 cal, 13.8g fat, 6g protein, 18g complex carbohydrates, 28g sugar, 3g dietary fiber, 69mg cholesterol, 273mg sodium, 265mg potassium, 101RE vitamin A, 3mg iron, 108mg calcium, 117mg potassium, 18mg caffeine.


Saturday, June 29, 2013

Cherry Almond Chicken Salad!

If you've been reading this blog for a while, you know that chicken salad shows up every now and then (because I love it). Well, it's back in a new way, with the sweetness of chopped dried cherries and the healthy crunch of slivered almonds. And oh, what a delicious sandwich it makes! Or, pile it up in the middle of a wedged tomato, or eat it with a fork right out of the bowl (guilty!).

The recipe is simple-as-pie, and without further adieu, here it is, because I am sure you would much rather make it than read about it!


CHERRY ALMOND CHICKEN SALAD

8 oz. cooked chicken breast, cooled and finely chopped
2 tablespoons chopped sweet onion (likeVidalia)
2 tablespoons slivered almonds, chopped a bit
2 tablespoons celery, finely diced
2 tablespoons dried cherries or cherry-flavored dried cranberries, finely chopped
a couple grinds of black pepper
enough mayonnaise to hold it all together

In a medium-sized mixing bowl, combine all ingredients except mayonnaise. Stir in mayo, a tablespoon or two at a time, until it's the way you like it. (Mayonnaise is a personal thing - I like just enough to hold it together).  There you go!

Toast some nice, whole-grain bread, slice a ripe tomato, and tear off some pretty lettuce leaves, and you have the makings for an amazing sandwich!

This was my lunch... the sandwich was my dinner! I LOVE this stuff!

And for no reason, thought you might like to see one of my baby tomatoes, happily growing among the petunias!


Gettin' along!
Just after I snapped this photo, a Hummingbird came to visit the pink petunias!

And before I go, I'll tell you something, I miss my boys! Katie and Bill took the boys to Mystic, CT (or as Henry says "Neticut") for a mini-vacation visiting friends. They're doing the whole seaport thing, and I am sure they're having a great time, long overdue, and well-deserved. As I was leaving my house this morning, I realized that there were yogurt hand prints on my French door leading to the staircase, and I just don't have the heart to wipe that away until I see those boys again. How crazy is that? I just love looking at those tiny handprints and they're going to stay until I see those little guys when they come home!


Henry (left) and Peter (right)... Missing them more than my luggage!!!


Have a great weekend, my friends!

Tuesday, June 25, 2013

Happy Birthday Cake from Baking Illustrated!

Recently, my very good friend Susan Parker asked if I'd bake the cake for her mother Ruth's 80th birthday. I was very happy to say yes, and I wanted this cake to be extra special. I've met Ruth a number of times over the years, originally when my daughter Meghan and Susan's daughter Christi were immediate best friends in 3rd grade at Greenfield Elementary School. As their friendship flourished, Susan's and mine did as well. There were many special moments and events that we shared, some of my happiest memories during the girls' growing-up years. Susan was a great mom to her growing family, and is an incredible grandmother now to an ever-expanding family. I have to imagine that the blueprint for Susan's commitment and devotion to her family has its foundation in her early years, that Ruth started something that continues today not only with Susan and her siblings, but also with Susan's three daughters - Melanie, Christi, and Erika - terrific young women, married with families of their own now. (Susan and her husband Tom also have a son, Michael, who's a very involved uncle!) Mellie has a son and a daughter, Christi has five children (two sets of twins - two boys and three girls!), and Erika has three daughters. Ruth's legacy is going strong and her family is so fortunate she is able to participate in her great-grandchildren's lives, continuing to create new memories.

So, for such a special mom/grandma/great-grandmother, I wanted to create a cake that would not only be pretty but would taste as good as it looked. I turned to my Baking Illustrated cook book, such a trusted resource. I settled on the Classic White Cake, and the recipe did not disappoint in the least. Unlike a traditional white cake recipe, this one does not use whipped egg whites.  The egg whites are there, in abundance, but they are blended in gently which the editors of the cookbook explain results in a moister, more tender cake. So, it's less complicated than other recipes - basically a blending of wet and dry ingredients - none of that whipping and folding - and it's a better cake. Win win! I also made cupcakes, fearing that the cake would not be enough for the large Parker family.  Here's a photo of the cupcakes, followed by the recipe for Ruth's birthday cake:


I was so happy to hear that Ruth loved her cake, and that the family said it was delicious. Music to my ears!  Happy, happy 80th birthday, Ruth Boucher. I hope you have a wonderful year, and many more!

Love,

Meghan's Mom
(Jeannie)


CLASSIC WHITE CAKE
(very closely adapted --almost word for word-- from Baking Illustrated)
Like all B.I. recipes, this is very detailed and provides every step for a successful result.

2 1/4 cups plain cake flour
1 cup milk at room temperature
6 large egg whites at room temperature (important)
2 teaspoons almond extract
1 teaspoon vanill extract
1 1/4 cups granulated sugar
4 teaspoons baking powder
1 teaspoon salt
12 tablespoons unsalted butter, softened but still cool

BUTTERCREAM FROSTING*
16 tablespoons (2 sticks) unsalted butter, softened but still cool
4 cups (1 pound) confectioners sugar
1 tablespoon vanilla extract
1 tablespoon milk
Pinch salt

Raspberry-Almond Filling
1/2 cup blanched almonds, toasted and chopped coarse
1/2 cup seedless raspberry filling

For the cake:  adjust an oven rack in the middle position and heat the oven to 350 degrees F.  Generously grease two 9-inch round cake pans and cover the pan bottoms with orunds of parchment paper or waxed paper.  Grease the parchment paper rounds and dust the cake pans with flour, tapping out the excess.

Pour the milk, egg whites, and extracts into a 2-cup liquid measuring cup and mix with a fork until blended.

Mix the flour, granulated sugar, baking powder, and salt in a bowl of a standing mixer set at low speed.  Add the butter; continue beating at low speed until the mixture resembles moist crumbs with no powdery streaks remaining.

Add all but 1/2 cup of the milk mixture to the crumbs and beat at medium speed (or high speed if using a hand-held mister) for 1 1/2 minutes. Add the remaining 1/2 cup of the milk mixture and beat 30 seconds more. Stop the mixer and scrape the sides of the bowl with a rubber spatula. Return the mixer to medium (or high) speed and beat 20 seconds longer.

Divide the batter evenly between the two prepared cake pans; using a rubber spatula, spread the batter to the pan walls and smooth the tops. Arrange the pans at least 3 inches from the oven walls and 3 inches apart. (If your oven is small, place the pans on separate racks in staggered fashion to allow for air circulation.) Bake until a toothpick or a thin skewer inserted in the center of the cakes comes out clear, 23-25 minutes. (NOTE:  my oven took 30-35 minutes).

Let the cakes rest in the pans for 3 minutes. Loosen from the sides of the pans with a knife if necessary, and invert onto wire racks. Re-invert to additional wire racks. Let cool completely, about 1 1/2 hours.

For the frosting: Beat the butter, confectioners sugar, vanilla, milk, and salt in the bowl of a standing mixer at low speed until the sugar is moistened. Increase the speed to medium-high; beat, stopping twice to scrape down the bowl, until creamy and fluffy, about 1 1/2 minutes. Avoid over-beating or the frosting will be too soft to pipe.
*I did not use this frosting recipe for Ruth's cake. I used my own buttercream recipe that is especially good for food coloring and piping because I decorate so heavily...

For the filling: Before assembling the cake, set aside 3/4 cup of the frosting for decoration. Combine 1/2 cup of the remaining frosting with the almonds in a small bowl and spread over the first layer.  Carefully spread the jam on top and cover with the second layer.  spread the frosting over the top and sides of the cake.  Pipe the reserved frosting around the perimeter of the cake at the base and at the top. Cut the cake into slices and serve.


Monday, June 24, 2013

Browned Butter Ice Cream

I've been promising my grandson Henry that I'd make ice cream. Today was the day. Henry picked up a big orange from my kitchen table and said he wanted orange ice cream. I already had plans to make a browned butter ice cream, an adaptation of a number of recipes for butter pecan that I'd come across in trying to find a really great dessert for a hot summer day. Today was just such a day. I had worked all weekend so I had today off, and as I woke up and my feet barely hit the floor, I could hear the pitter patter of grandsons' feet coming up the stairs with the greeting "Hellooooo Meena!" It was Pete's enthusiastic morning hello. Henry immediately asked if we could make ice cream so we got started.

This recipe is fantastic and results in an ultra-creamy ice cream (about 2 1/2 cups total). It uses browned butter and brown sugar, whole milk, just a 1/2 cup heavy cream, and a little maple syrup for a nice nuttiness. Pecans or sliced almonds can be added at the end, if at all (I kept them out but had sliced almonds on the side). I told Henry it was butterscotch ice cream because he was still disappointed about not using the orange, but I know he loves the flavor of butterscotch, and with the use of butter and brown sugar, it has a nice butterscotch-y flavor. He was so happy with it that he asked his Mom if they could make it at their house too (Katie has a Kitchen Aid ice cream maker attachment). We're thinking of all kinds of fresh ingredients for home-made ice cream this summer!

BROWNED BUTTER ICE CREAM
Makes about a pint and a half

1 cup salted butter (2 sticks - don't worry, most of this won't end up in the recipe)
2 cups whole milk
1/2 cup heavy cream
2/3 cup packed light brown sugar
2 tablespoons cornstarch mixed into a slurry with 2 tablespoons milk
2 tablespoons maple syrup
Optional: 1/2 cup nuts (pecans, walnuts, sliced almonds)

Directions:
In medium saucepan over medium to high heat, brown the butter just until it loses its yellow color and takes on a brown hue, removing from the heat before it gets too brown or starts to burn. Watch closely as this can happen fast.

Pour the browned butter into a glass container and allow the browned solids to sink to the bottom, separating into clarified butter (to be used later for lobster or some other luscious seafood!). Once the solids have settled, pour off the clarified butter into a container and set aside. Return the browned butter solids to the saucepan and add the milk, heavy cream, brown sugar, and maple syrup.

Stirring constantly, bring to a boil over medium to high heat and continue stirring as it boils for exactly four minutes. You can lower the heat as long as it keeps boiling.  At four minutes, stir in the cornstarch slurry and boil for about 30 seconds, no longer.  Remove from heat and allow to cool.  When cool, chill in refrigerator for a few hours.

Pour chilled mixture into ice cream maker and freeze according to manufacturer's directions. I have a Cuisinart, and I let it churn for 18 minutes. After the ice cream has churned for the specified time, move the mixture into a freezer-safe container and freeze for a few hours, until it is scoopable.

Browned Butter Solids

Cooked ice cream mixture, before chilling and freezing

Scooped, with sliced almonds. Amazing!

Peter, 2 1/2, and Henry, 5  My Wild and Crazy Guys!

Tuesday, June 18, 2013

Lemon Zest Cookies with White Chocolate and Toasted Coconut

Well, I'm at it again. Baking cookies, and this time they are for my friends Sue and Kim, who are both celebrating birthdays this week. We're going to meet for lunch tomorrow (today by the time this is posted), where I'll give them their gifts as well as this gift from my kitchen.

Must say, Alton Brown's sugar cookie recipe gets no rest in my kitchen! This time, I changed it up a bit. I added the zest of one small lemon to the dough. I used a 3-inch round biscuit cutter to form the cookies, and spread the cooled cookies with melted white chocolate, and sprinkled toasted coconut (yep, I'm on a kick) over that! Rather than linking to the recipe in a previous post, below you find my adapted version. It's half the original recipe (in quantity) and made about sixteen 3-inch round cookies. Actually, it made 17, but one didn't look quite right so I had to eat it. Had to. (Love the addition of lemon!)

Here's the recipe:

Lemon Zest Cookies with White Chocolate and Toasted Coconut
Oven - 375 degrees Farenheit
inspired by Alton Brown's sugar cookie recipe

1/2 cup soft butter
1/2 cup granulated sugar
1 egg
1 teaspoon vanilla extract
1/2 teaspoon lemon extract
zest of one small lemon (about a tablespoon fresh zest - if using dried zest, use 1 teaspoon)
1 3/4 cups all-purpose flour
1/2 teaspoon baking powder
1/4 teaspoon salt

Cream butter and sugar well. Scrape bowl and mix again. Beat in one egg, extracts, and lemon rind.  Beat very well. Add flour, baking powder, and salt. Mix until well combined and scrape bowl to make sure it is all incorporated. No need to chill this dough - it's ready to go as soon as it's mixed. 

Turn dough out onto floured surface. Pat dough into a round and dust top and bottom with more flour.  Roll 1/4-inch thick and cut with 3-inch (or desired size) biscuit cutter or round cookie cutter (or any shape you want). Cut out cookies. Reroll scraps and cut more cookies until all the dough has been used up.  

Place cookie rounds on cookie sheet, about an inch apart. I fit a dozen on one sheet - 3 across, 4 down. Bake for 7-9 minutes or until bottoms just begin to brown. Remove from oven and cool on wire rack.

Decorate with white chocolate and coconut:

1 cup white chocolate or white confection morsels, melted (three, 30-second intervals in the microwave did it for me).
toasted coconut (about 1/2 cup, spread on cookie sheet - 350 oven for 6-7 minutes - watch so it doesn't get too brown).

Spread about a teaspoon of melted white chocolate on one end of a cookie. Sprinkle with toasted coconut.  

Cool until white chocolate is set - a few hours, or you can speed it up in the fridge or freezer.

YUM!


Sunday, June 16, 2013

June Showers, Baby Cakes, and Cookies!

Here in upstate New York, we won't let the almost certain chance of rain dash our plans. I've heard it said that, here, "If you don't like the weather, wait five minutes!"After what seems like rain every day so far for the first two weeks of June, we seem to have turned a corner and the sun came out late Friday afternoon, all day yesterday, and this Sunday morning I woke to bright sunshine streaming through my bedroom window. What a nice surprise, especially after the forecasters advised to get any outdoor plans accomplished on Saturday. I haven't checked the weather for the rest of today, and this cheerful morning sun could go tuck itself behind some clouds later today, but for now, I'm enjoying it!

There's been a bit of baking going on in my kitchen over the past few days, which has been somewhat challenging given that I hurt my elbow the other day. In an attempt to fling a too-heavy bag of trash into the back of my son-in-law's truck (after emptying my refrigerator of out-dated items I'd planned to cook/eat but never did - heavy things like ricotta cheese, etc. -- a huge waste of money!!!) it happened. I didn't realize how heavy the bag actually was and how (apparently) weak my right arm is when the bag didn't quite make it up into the truck and bent my poor elbow back in the wrong direction! So, woe is me but I'm on the mend with good advice from Russ (chiropractor b'friend). Still, there were cookies to finish and a fondant baby to make for my friend Cindy's daughter's baby shower, and there was no way I was going to disappoint them. I tried to switch my brain to using my left hand over my right, and everything worked out fine.

Before the elbow fiasco, in addition to baby feet cookies, there was enough cookie dough left over to make a few chocolate-dipped cookies with toasted coconut. The recipe follows - it's the same sugar cookie recipe I always use, from Alton Brown. The only thing I don't do is refrigerate the dough as he suggests. Instead, I let it rest at room temperature for a few minutes and then roll it out without chilling. It always works very well so I suggest you do the same. Chilling made it too stiff to roll (must be all that butter!).

Baby Cake and Cookies!
And here's the easy recipe for those chocolate-dipped toasted coconut cookies:

CHOCOLATE-DIPPED TOASTED COCONUT COOKIES

Sugar cookie dough - enough for 2 dozen cookies
Melted chocolate (I used 1 cup of Wilton's Dark Chocolate Candy Wafers)
Toasted Coconut - about 1/2 -1 cup (you can save whatever you don't use)

Bake sugar cookies in 2-inch (or whatever size) rounds according to recipe directions. I used a biscuit cutter to make the circles.  Allow to cool on wire rack.

Toast coconut: In pre-heated 350-degree Farenheit oven, on ungreased cookie sheet, toast coconut just until it begins to brown. It took 7 minutes in my oven. Remove from heat.  Put toasted coconut in a bowl.

Melt chocolate.  I melted my chocolate wafers in the microwave for 1 minute. Be careful - the bowl gets hot. Remove from microwave and stir until it's smooth. If using chocolate chips, you can add 1 tablespoon of shortening to the chocolate before you melt it - thins it enough for easier dipping.

Dip one side of cooled cookies into melted chocolate.  Hold over coconut and sprinkle coconut over melted chocolate.  Allow to cool on cookie sheet until chocolate is set (you can pop it in the fridge or freezer for a few minutes to speed up the process).

Chocolate-dipped Toasted Coconut Cookies!

I hope you all enjoy this beautiful Sunday, and I wish every father, grandfather, and Godfather a wonderful day with those you love.

Enjoy!


Wednesday, June 5, 2013

Berry Crumble Bars

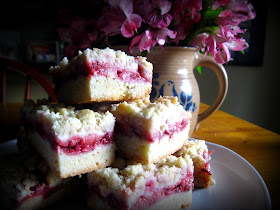
Trying to determine how to best use a leftover portion of sugar cookie dough, I decided to make a crumb bar with the pound of strawberries in my fridge. I figured that the cookie layer, topped by chopped and sweetened fresh strawberries and a simple crumb topping would make a great dessert. So that's what I did. I experimented, and it worked! This could be even simpler with ready-made sugar cookie dough, but I used the leftovers from a recent batch of Alton Brown's sugar cookie recipe. I took the dough out of the fridge last night before I went to bed, and when I got up this morning got right to work putting this fruity dessert together.

After an exceptionally busy day, with Katie and Bill attending a friend's grandfather's funeral (sadly), and me taking the day off from work so the boys wouldn't have to miss a swimming party, we enjoyed a nice take-out dinner of Chinese food (Katie's contribution) and I brought down the plate of Strawberry Crumble Bars.They are sweet but not too, and while we didn't add anything to them, they could be REALLY great warmed up with a little vanilla ice cream.

Here's the recipe and a few photos...

BERRY CRUMBLE BARS
Oven 350 degrees Farenheit
Spray an 8x8 inch square pan with cooking spray

Ingredients:

Crust:  2 cups sugar cookie dough

Filling:
1 lb. fresh strawberries, hulled and then coarsely chopped (or any other berry of choice - add more sugar if it is a particularly sour berry)
2 tablespoons granulated sugar
2 tablespoons cornstarch

Crumb Crust:
1 1/4 cups all purpose flour
1/2 cup granulated sugar
8 tablespoons soft butter

Directions:

Prepare berries: toss chopped berries with sugar and cornstarch and let sit for about 10 minutes. Drain excess liquid from strawberries.You don't want this liquid making the dough soggy.

Press sugar cookie dough in bottom of prepared 8x8 pan.

Using a slotted spoon, put well-drained strawberries on top of cookie dough in pan, covering entire surface.

Top with crumb topping - directions follow:  mix flour and granulated sugar. Cut in butter until well combined and, using your hands, press the mixture together to clump. Break clumps over top of strawberries creating large crumb pieces (see photo as example).

Bake for 40-45 minutes or until top crumbs begin to brown. Remove from oven to cooling rack.  When completely cooled, cut into 16 squares.

Enjoy every bite!


And here are a few photos of the boys' day at the swimming party. Katie was sorry to have missed it, but I was very happy to fill in!