 |
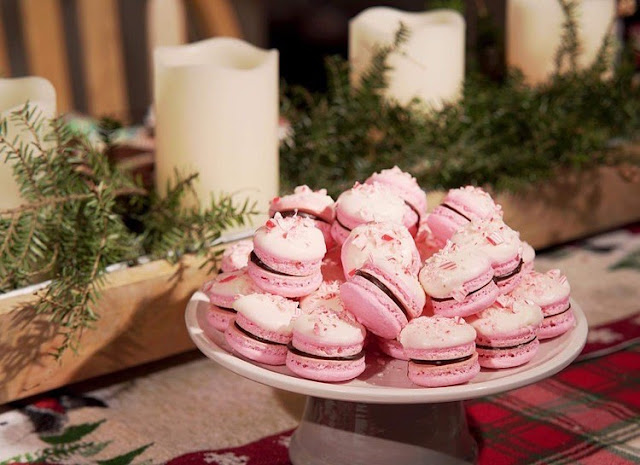
| Photo by Ross Kowalewski, @rkiiifoodphotography |
Macarons and I have a spotty history. I've tried so many techniques, relied on sworn "best" or "fool-proof" recipes, and short of praying to the macaron gods, have had varied results. I've been both overly confident and totally defeated. I've had different results from the very same batch of macaron batter! The first sheet comes out beautifully, the next lopsided and cracked. In my failures and successes, I've learned a few things but mainly, simpler is better. So, I have a few standard practices that have given consistently great results (see photo above!) and I'll share those tips with you.
My tips - Read first!:
1. Aged egg whites at room temperature - I let them sit overnight on the kitchen counter in a small bowl covered in plastic wrap with holes punched in the wrap. I've also put them in the fridge for a couple of days until I could get around to making the macarons. This dehydrates the whites a bit so they are sturdier when whipped.
2. Addition of egg white powder - about 1 tbs per 3 egg whites which helps to stabilize.
3. Don't beat the egg whites to death
4. Wipe all surfaces (bowl, beaters, silicone baking mats) with white vinegar. NOTE: I have used parchment paper where the macarons stuck/broke, and the silicone baking mats work beautifully! Don't buy the ones with the recessed wells, though. I've read they can be a nightmare! I bought the silicone mats made for macarons with the printed circles.
5. Oven - preheated to 290 F, middle rack and just ONE cookie sheet at a time.
6. Baking time: 14 minutes for smaller Macs, 16 for larger in my oven.
And here's the shocker: rather than fussing with a food scale and measuring ingredients to the precise gram, I have had consistent success using measuring cups for granulated sugar, confectioners sugar, and almond flour.
Equipment needed:
Two mixing bowls
Hand-held mixer
Spatula
Strainer
Measuring cups
heavy cookie sheets
silicone mats with the printed circles
White vinegar/paper towel
Plastic/disposable pastry bag (16-inch - small won't do) note: I wash and re-use these
#12 Wilton tip with a large circle opening
zip top bag
Recipe:
Macaron ingredients:
1 3/4 c. confectioners sugar
1 c. almond flour
3 egg whites, room temperature, aged
1/4 c. granulated sugar
1 tablespoon egg white powder
gel food coloring - 2 drops
White chocolate morsels or candy melts, about 4 oz.
candy canes, crushed (about 2)
Chocolate buttercream ingredients:
12 tablespoons unsalted butter at room temperature
1 1/2 cups confectioners sugar
1/4 c. cocoa powder
pinch salt
1 tsp. vanilla extract
A couple tablespoons milk
Steps to making the macarons:
1. Preparing: Invert a half-sheet pan or other heavy-duty cookie sheet (thin pans don't work, they get too hot) and place silicone baking mat on top. Wipe down baking mat with white vinegar. You'll need at least two pans prepared this way. The macarons cook more evenly on an inverted cookie sheet. The oven air flows more consistently, I've found.
Into a mixing bowl, sift/strain 1 3/4 c. confectioners sugar with 1 c. almond flour. Any almond flour bits that don't go through the strainer can be discarded. Whisk to blend thoroughly. Set aside.
2. Mixing:
In another mixing bowl that's been wiped down with vinegar: with a hand-held mixer, beat egg whites until foamy, then slowly add in 1/4 c. granulated sugar. Add in 1 generous tablespoon egg white powder (this stabilizes the liquid egg whites). Beat to just-stiff peaks. You'll know it's stiff peaks when the meringue doesn't flop off the beater and creates a 'beak' or when you can turn the bowl over and the meringue stays firmly in place. You can add food coloring at this point. Use a gel color and just a drop or two. Beat another few seconds until color is infused throughout.
3. Macronage:
Now, take about a third of the almond flour/confectioners sugar mixture and fold it in to the meringue, using your spatula to flatten out the batter. Fold in, around, down until it's all mixed in, and do that two more times with the rest of the almond flour mixture. This process is called 'macronage.' Continue to scrape, fold, turn, and press until the batter begins to flow off the spatula and you can form a loose figure 8 with the batter. The STOP.
4. Piping:
Fit a large pastry bag with a round tip (Wilton #12) or similar sized other brand. I trim off the pointed bottom of the pastry bag just enough so the tip can drop in and fit snugly. Twist tip to close off and then place pastry bag in a large cup or glass and open up. Using your spatula, load macaron batter into the bag, leaving a good 6 inches or so empty so you can twist it shut. I use a twist-tie around the bag at the top of the batter so it won't ooze out.
Holding the pastry bag at a straight up-and-down 90-degree angle, pipe batter from bag to form circles using the guides on the mat or just making consistent 1 1/2-inch macarons or as big/small as you like. Give bag a quick flick to stop the flow and move on to the next one.
5. Resting/drying:
When sheet is filled, carefully but energetically tap the bottom of the pan which helps to release any air bubbles. Pop large bubbles with a toothpick. Now, let the pan rest for about 1/2 hour to 40 minutes OR until you can touch the side of a macaron and it's somewhat dried and doesn't stick to your finger.
About 20 minutes into drying, I pipe out the next sheet so it can rest for 40 minutes as well.
6. Baking:
After 40 minutes resting, carefully place macarons in oven and set timer for 14 minutes. If you can wiggle the top of the macaron at 14 minutes, give it another two minutes in the oven. If it's ready, it won't wiggle.
7. Filling:
Cool completely. Match up tops and bottoms by size and fill half the macarons (bottoms) with chocolate buttercream* recipe follows), using about a teaspoon of filling. Gently press bottoms of two macarons together so filling reaches the edge. I find piping the filling to be easier than using a spoon.
8. Make 'em fancy!:
Melt white chocolate or candy melts in a small bowl in the microwave, according to package directions.
Crush a couple of candy canes in a plastic bag to create peppermint sprinkles. I use a zip-top bag and a meat tenderizer, smooth side.
After you dip the top of an assembled macaron in the melted white chocolate, generously sprinkle crushed peppermint on top. Let cool.
9. Maturing (also known as waiting):
Macarons 'mature' in about a day. Before that, they just haven't reached their full, delicious potential. With the filling in place, the macarons absorb some of their moisture and the flavors develop. So, give them the time they deserve. Of course, if you want to 'test' one, I won't tell anybody!
*Chocolate buttercream:
Beat butter until light and fluffy. Add confectioners sugar and cocoa powder and VERY SLOWLY mix together on lowest speed (careful, it can fly out of the bowl). Add vanilla and 1 tbsp. milk, and then add more milk a bit at a time until the buttercream reaches a med/stiff frosting consistency. Less is more with milk, add just a drop at a time because if you add too much, there's no going back.
10. Report back!
Let me know if you try this recipe. It's not as complicated as it sounds, but then again, macarons ARE complicated and I wish you (and me!) luck every time!


