Friday, December 30, 2011

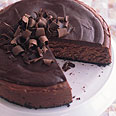
For New Year's Eve: Killer Chocolate Cheesecake

This recipe for chocolate cheesecake is adapted from one I found on Epicurious.com, with a few changes.  It's a "deep, dark" chocolate cheesecake with a chocolate crumb crust and a layer of chocolate ganache as its crowning glory.  (The English major in me knows it's wrong to use the word "chocolate" three times in one sentence, but I can't help it!)  Their version suggests the use of 70% chocolate and expensive cocoa, but you can have fantastic results with Hershey's semi-sweet chocolate as well as Hershey's cocoa.  It's so deeply, darkly chocolate that a small sliver will do.  Make it ahead and take it out of the fridge a couple of hours before serving to maximize the flavor experience.  I'm making it tonight!

KILLER CHOCOLATE CHEESECAKE
Oven 350 degrees F

Crust
24 chocolate wafer cookies (from one 9-ounce package), crushed into fine crumbs
1 tablespoon sugar
1/4 cup (1/2 stick) butter, melted

Filling
1 3/4 cups semi-sweet chocolate chips
4 (8-ounce) packages cream cheese, room temperature
1 1/4 cups sugar
1/4 cup unsweetened cocoa powder 
4 large eggs

Topping
3/4 cup whipping cream
3/4 cup semi-sweet chocolate chips


Crust:
Preheat oven to 350°F. On lowest oven rack, place a baking pan filled with hot water.  This will act as an indirect water bath and will help to minimize cracking.  Cheesecake will bake on center oven rack.

Butter 9-inch springform pan. Mix cookie crumbs with butter and press crumbs evenly onto bottom only of prepared pan. Freeze for 10 minutes while preparing filling. 

Cheesecake:
Melt chocolate in metal bowl set over saucepan of simmering water, stirring until melted. Don't let water hit bottom of bowl.   Take off heat and cool chocolate until lukewarm but still pourable. 

In large mixer bowl, bllend cream cheese, sugar, and cocoa powder until smooth. Blend in eggs, one at a time. Add  lukewarm chocolate. Pour filling over crust; smooth top. 

On center oven rack, bake until center is just set and just appears dry, about 1 hour. Cool 5 minutes. Turn oven off and prop door open.  Let cheesecake remain in oven for an hour.  Run knife around sides of cake to loosen. Chill completely before adding ganache topping.

Ganache topping:
Stir cream,  and 3/4 cups chocolate chips in heavy medium saucepan over low heat until smooth. Cool slightly. Pour over center of cheesecake, spreading to within 1/2 inch of edge.. Chill at least1 hour.  Cover with foil and keep refrigerated.

Release pan sides. Transfer cheesecake to platter.  Let stand 2 hours at room temperature before slicing.

Photo credit:  Epicurious.com's Deep Dark Chocolate Cheesecake

Thursday, December 29, 2011

Chunky Pineapple Upside Down Cake

For my son-in-law Bill's birthday this year (35!), I made his traditional favorite: pineapple upside down cake.  I added a twist to it this year by using chunk pineapple (canned) and almost a whole jar of maraschino cherries.  I also made this cake more of a pound cake, unlike the usual basic yellow cake.  This cake is a cinch to make, and so delicious.  It holds birthday candles well, though Henry beat Bill to it and blew out the candles before his daddy had a chance!

Here's my recipe, which, if you taste it, might become yours too!

CHUNKY PINEAPPLE UPSIDE DOWN CAKE
Oven - 350 degrees F, preheated
10" round cake pan, deep sides (3") or 13 x 9 pan, spray bottom with cooking spray

1 bar butter, melted
1 cup brown sugar
1 standard sized can of pineapple chunks in juice, drained; juice reserved for cake
1 yellow cake mix
1 box instant vanilla pudding mix
4 eggs
1/2 cup vegetable oil
pineapple juice plus water to equal 1 cup liquid
small jar maraschino cherries, out of the juice

Whipped cream

Directions:

Pour melted butter into prepared pan.  Sprinkle brown sugar evenly over butter.  Press down with fork to moisten sugar and make sure it is distributed evenly.  Place pineapple chunks evenly over brown sugar/butter mixture.  Sprinkle maraschino cherries among the pineapple chunks.  Set aside.

In large mixer bowl of electric mixer or with hand-held mixer, slowly mix all cake ingredients:  cake mix, pudding, eggs, oil, juice and water.  Once incorporated, beat ingredients for about 3 minutes.  Pour cake batter evenly over pineapple and cherries, leaving enough head-room for cake to rise.  If you have too much batter, save it for a little cake or some cupcakes.

Bake for 45-50 minutes OR until top bounces back when lightly pressed and toothpick inserted in center comes out clean.  Remove from oven and let cake sit for 10 minutes.  Turn out onto serving platter.  Can be served while still warm with a spritz of whipped cream.

Heavenly...

Tuesday, December 27, 2011

Lemon Pound Cake

On Christmas Eve, I brought a lemon pound cake to my friends Diane and Bob Loviza.  They were incredible hosts and put out an amazing buffet, including many pans of delicious lasagna with salad, bread, and all kinds of nibbley food and desserts.  Today, their daughter Tina asked me to post the recipe for the pound cake which was my contribution to the evening.  She loved it, and it is remarkably easy, so I am posting the recipe here.


LEMON POUND CAKE
preheat oven to 350 degrees Farenheit


Prepare bundt cake pan (grease and flour, or spray with cooking spray)

In large mixing bowl, with electric mixer on slowest setting, mix:

1 lemon cake mix
1 package instant lemon pudding mix
4 eggs
1/2 cup vegetable oil
1 cup water

Mix until all ingredients are moistened, turn mixer to medium high speed and beat until thoroughly combined and batter is thick.  Scrape sides and beat again for a few seconds.

Pour batter into prepared pan.  Bake for 45 mintues to one hour, depending on your oven.  Cake is done when top springs back when lightly pressed, or toothpick is inserted and comes out clean.

Cool for 15 minutes in pan.  Turn out onto cooling rack.

When cake is completely cooled, drizzle with lemon glaze (1/2 cup confectioners sugar, 1/2 teaspoon lemon extract, and enough water - a teaspoon at a time - to make a runny glaze).  After glaze sets, dust top with a sprinkling of confectioners sugar.

Tuesday, December 20, 2011

A Whole Lotta Baking Goin' On

My kitchen is doing overtime as baking central.  Tonight alone, I'm baking brownies for a co-worker's birthday, a birthday cake to be frosted and decorated tomorrow night, a Grand Marnier pound cake (and a couple of little pound cakes), cinnamon rolls to freeze for friends who'll bake them themselves Christmas morning,  and before I go to bed, there'll be yet another batch of peppermint bark.  This is nothing.  Tomorrow night, I'm baking a whole slew of pound cakes to deliver to friends on Thursday. The star of the show, tonight, is the Grand Marnier pound cake.  My version of the recipe follows (adapted from many, including a recipe from the 70s, the "Harvey Wallbanger" cake). This cake is great, a dense pound cake infused with Grand Marnier (or Triple Sec if you have it).  Pound cakes in general are very good things...

GRAND MARNIER POUND CAKE
oven - 350 degrees F

Makes 1 bundt pan or 2 loaves

Grease and flour pan(s) or spray with baking spray

Ingredients:
1 yellow cake mix (white is fine as well)
4 eggs
1 package instant vanilla pudding (4 serving size)
1/2 cup vegetable oil
1/2 cup orange juice
1/2 cup Grand Marnier

In large mixer bowl, slowly mix all the ingredients.  Turn mixer to medium speed and beat until all ingredients are thoroughly combined and the batter is thick and smooth.  Pour batter into pan(s) and bake until cake tests done (top bounces back when pressed lightly) or toothpick comes out clean.  For a bundt pan,  bake 45 minutes to start and test for doneness, adding time if necessary.  Oven temps vary so bake according to your own oven's personality.

While cake is baking, make glaze:

1/3 cup Grand Marnier
1/3 cup granulated sugar
1/3 cup orange juice

Bring to a boil, reduce heat to lowest setting and simmer for 5 minutes, not a minute more.  Turn off  heat.  (Watch carefully, sugar can burn very easily, as I learned all too well in my last apartment as the fire department arrived just in time - catastrophe averted!)...

Cool cake 10 minutes, remove from pans and cool on cooling rack.  While still warm, brush glaze over top, twice.  When completely cooled, lightly sift confectioners sugar on top.

Sunday, December 18, 2011

In the Craziness, Old Ornaments Bring Peace

Christmas is one week away.  I don't have it all together these days, at work, in life, or even managing to relax.  I worry about everyone I love, I miss my California kid, and my still-to-do list is mostly unchecked.  There is always too much to do and not enough time to do it, so this morning, as I was going over that list of everything I think has to be accomplished today, I stopped.  Just stopped.  Instead, I took time to really look at the ornaments on my Christmas tree, and the decorations still randomly placed around my house (not  yet perfectly situated) and got caught up in the memories of Christmases past.  With that, a sense of peace came over me.

There's the Norman Rockwell ornament that was one of the very first collected in the early years, before kids.  There's Katie's first attempt at embroidery, and the ceramic angel, now missing one wing.  There's the tree-topper that's graced my tree since 1982, the one I made in a ceramics class and it has the kids' names etched on the bottom.  Then there's the Cabbage Patch ornament I made from a kit (made a lot of those!),  and Tricia's first stocking, in cross-stitch and barely completed in time, which hangs on my tree every year.  There's Meghan's nursery school construction paper bow with big red glitter, about 28 years old now (yikes!)...  I love the clothespin tin soldier one of the kids made at Greenfield Elementary School, looking its age, I'm afraid.  And the ceramic drummer boy, also made in  the same class that produced the tree-topper.  Each ornament has a story, and the ones that were once lost among the shiny manufactured ornaments are displayed with the most pride today.

These are a few of my favorite (Christmas) things!
(click to enlarge)

If you, like me, are caught-up in too many to-dos, stop and spend some time looking at the precious ornaments that you've treasured over the years.  I guarantee it will put things in perspective!

Have a great Sunday!

Tuesday, December 13, 2011

Twelve Days 'til Christmas

Every Christmas, I make a mental note to make a real note about all the things I'll do next Christmas to make it all simpler, easier, more enjoyable, with promises to trim this year's to-do list and spend my energies on things that really matter. I especially tell myself to enjoy the weeks leading up to Christmas, and not get lost in the myriad of self-assigned responsibilities that make that time go by too quickly without any real stopping to smell the Christmas tree.
Most of the people I know have already finished their Christmas and holiday shopping and are on to wrapping.  I haven't purchased one gift  yet, and I won't until this weekend.  It's my Saturday to work, and before I know it another week will have sped by and the pressure will be on.

As always, baking will take up a big chunk 'o time, but that's somehow restorative for me (and would be more-so if only the Elf on the Shelf would jump down and empty my dishwasher as I sleep!).

Here's a list of the things I still want/have to do over the next twelve days, until Christmas, and I wonder how many I will actually accomplish!:

Address Christmas cards.
Buy stamps for Christmas cards.
Mail Christmas cards.
Buy a ton of baking supplies.
Bake a ton.
Distribute the baked stuff.
Put ornaments on the tree that's been up with just lights for a week.
Call Meghan and send her birthday gift (a happy task)
Display my collection of ceramic Santas made from antique chocolate molds.
Finish my list and check it twice (for other people, not for me!)...
Buy gifts.
Wrap gifts.
Send gifts.
Go to the Irish store for no reason at all.
Read something spiritual and inspiring about the Nativity.
Buy a Christmas wreath for my naked front door.
Spend time with my kids.
Buy gift for Yankee Gift Exchange at work.
Decide what food to bring to office party.
Hang some garland and lights.
Make my entry way welcoming.
Bake some more.
Walk up and down Broadway in Saratoga Springs, with Henry if possible (to see his 3-year-old reaction to the beautiful lights and sights).
Spend as much time as possible with Hank and Pete.
Take lots of photos of  Hank and Pete.
Spend time with Russ.
Find time to have drinks with friends after work.
Find time for a weekend breakfast with friends.
Make a simpler list for next year, and choose a date now so that next year, I will finally manage to host a get-together in my own home and pull it off!


Photo Credit:  http://blogs.abc.net.au/.a/6a00e0097e4e6888330148c680be26970c-500wi

Sunday, December 11, 2011

A little break to visit a good friend...

Jan and Leila walking
along the Connecticut River
Yesterday, Saturday, I left for an overnight trip to Hatfield, Massachusetts to visit my friend Jan.  It's a trip I love to take, just about 2.5 hours from home, and a lovely ride through eastern New York and western Mass.  There wasn't much evidence of winter along the way, except for the colder temperatures, with the exception of the Stockbridge/Lee areas, where there was a good covering of snow, probably about six inches.  I was happy to take my new Jeep for its first real road trip, and it did just fine.

When I visit Jan, we usually pack a lot in to the 24 hours or so that I'm there.  We started out yesterday afternoon with a walk with her dog, Leila (10-year-old Golden Retriever), taking the trail behind Jan's home, along  the Connecticut River.  It's a gorgeous stretch of land and the scenery is completely unspoiled.  After our walk, we brought Leila home and then headed toward the mall in Amherst where we did a little shopping and then went to the movies.  We saw The Descendants with George Clooney, one of the very best movies I've seen in long, long time.  (Who couldn't watch George Clooney for a couple of hours, I ask you?!!!)...  Jan and I splurged and split a medium movie popcorn, despite all the health warnings against such an indulgence (it was SO good!), figuring that once every six months or so, it isn't going to do that much damage!  As we left the movie, I told Jan that it was one that I'll want to have for my own once it comes out on DVD.  We both loved it.

For dinner, we stopped at a seafood restaurant near Jan's house, Fish Tales, where she had a salad with grilled chicken and I had a filet of fish sandwich, which was really very good.

This morning, Jan treated me to a protein shake with strawberries and a cup of tea, and then we went to a food co-op where Jan is a member, and she bought a bunch of organic foods, including her favorite salmon cakes that she'll have during the week with pasta or salad.  I really admire the way Jan not only shops but eats.  She puts a lot of thought and planning into her menu, and I think she is rewarded with not only healthy but delicious meals.  I'm making a note to myself to follow in her footsteps!

Before I headed home, we took another walk with Leila, and I had my camera ready (big shocker!) to try to capture some of the beautiful light with my beautiful subjects, Jan and Leila. I also caught a few photos of Pearl, her calico kitty.  I had the best time with my friend, and I can't wait to visit her again.  On the Mass Pike heading west, I saw the sign that said "You are leaving Massachusetts.  Please come back soon."  to which I responded out loud "OK, I will!"

Pearl
Pearl through the sliding glass door -
with my reflection
blurring up the works!

My one-day get-away!  Click to enlarge...


Wednesday, December 7, 2011

Barilla's No-Boil Lasagna Recipe

Last weekend I decided to make a pan of lasagna, and for the first time used Barilla's no-boil lasagna noodles.  I thought it went together very well, and though I didn't keep the end result at home to try, believe it was well-received.  By not having to boil noodles, a cumbersome and somewhat messy step is completely eliminated.  I'm all for that.  The recipe is on the back of the Barilla no-boil lasagna ("Lasagne" on the box) noodles, but I'm providing it here as well.  I've read that you can do this with any lasagna noodle, but I wanted this to be just right, so I used Barilla.  I trust their pastas implicitly, and love how on different types the very reliable cooking time is right there on the front of the box.  Simple is better!

Many families traditionally serve lasagna during the holidays, so if you would like to save yourself a little work (this is still work, but not as much as the standard recipe), try this version.

BARILLA NO-BOIL LASAGNA NOODLES LASAGNA

1 box (16 sheets) Barilla No-Boil Lasagna Noodles
1 lb. ground beef or ground sausage, cooked to crumbless and drained (or half-and-half is what I did).  You could also use veggie crumbles.
2 jars Barilla Marinara sauce
2 eggs
4 cups shredded mozzarella cheese
15 oz. container ricotta cheese
1/2 cup grated Parmesan (or Parmesan Romano) cheese

I used a disposable foil pan because my lasagna was traveling, but if you have a deep rectangle casserole dish you can use that.  A 13x9 might need to eliminate one layer or it might spill over.

Brown meats and crumble as they cook.  Drain.

In medium bowl, beat two eggs, and combine with ricotta with 2 cups of the mozzarella and 1/2 cup grated parmesan.  Set aside.

Spray pan with cooking spray.
Layer 1:  Spread 1 cup of marinara sauce in pan.  Cover with 4 noodles, overlapping a bit as necessary.  Spread with 1/3 of the ricotta cheese mixture.  Layer half the meat over top. Sprinkle with 1 cup mozzarella. Spread 1 cup marinara over that.

Layer 2:  Cover first layer with 4 more noodles.  Spread with next 1/3 of the ricotta mixture.  Spread 1 cup marinara over that.

Layer 3:  Cover 2nd layer with 4 more noodles.  Spread last 1/3 of the ricotta mixture.  Layer last half of the meat over that.  Spread with 1 cup marinara.

Layer 4:  Cover 3rd layer with last 4 noodles.  Spread remaining marinara over top, completely covering noodles.  Sprinkle last 1 cup of mozzarella over top.

Cover pan with aluminum foil.  Bake at 375 degrees F for 50-60 minutes or until bubbling.  Remove foil and bake for another 10 minutes.

Let stand for half an hour before cutting.

Photo credit:  http://www.google.com/imgres?um=1&hl=en&sa=N&biw=1220&bih=634&tbm=isch&tbnid=F_XzKvG1HooK4M:&imgrefurl=http://www.familyoven.com/recipes/search%3Fterms%3DBarilla%2520No-boil%2520lasagna&docid=48wIsVqqT1D_hM&imgurl=http://familyoven-recipe-images.s3.amazonaws.com/160610-medium.jpg&w=200&h=175&ei=fAXgTvbFHqTh0QHoqNmgBw&zoom=1&iact=hc&vpx=347&vpy=177&dur=1017&hovh=140&hovw=160&tx=102&ty=48&sig=109143948364871047453&page=1&tbnh=136&tbnw=158&start=0&ndsp=16&ved=1t:429,r:1,s:0

Saturday, December 3, 2011

Mrs. London's, Saratoga Springs, New York

Today my friend Liz called to see if I'd like to join her and our friend Mary at Mrs. London's in Saratoga Springs.  When she called, Henry and I were on our way to Target in search of special new sneakers.  I told Liz that if she didn't mind my bringing a 3-year-old along, we'd love to join her.  She said, "You're talking to two Grandmas here."  Liz has two grandsons, just a bit younger than Henry and Pete, and Mary has a bunch of grandchildren, so  Henry was more than welcome.  Once Henry settled on the Spider Man sneakers (that light up with each step!) and we paid for them, we were on our way to Broadway and Mrs. London's to meet my good friends..

I ordered tomato cheddar soup and half a chicken salad sandwich on Rock Hill Farm farm bread (the very best bread I've ever had).  Both were outstanding.  I'm going to figure out how to make that soup and blog about it, soon!  Meanwhile, here are a few photos of our time at Mrs. London's today.  It was a lot of fun, and I'm very glad that Liz called!

Chicken salad sandwich on Rock Hill Farm bread, and tomato cheddar soup!
Henry and the disappearing gingerbread boy!

Thursday, December 1, 2011

Chocolate Chip Orange Cookies

I've been thinking about favorite flavor combinations (my favorites) and chocolate/orange keeps coming to mind.  I said to myself, "Why not add orange to my classic chocolate chip cookie recipe?" so that's what I did.  When he came for Thanksgiving, Russ brought a case of Florida oranges that he bought from the Lions Club.  They are almost the size of grapefruits, fairly thin-skinned, with a bright orange zest, the perfect subject for this recipe!

 Right now, in the oven, is the first batch of chocolate chip orange cookies.  The batter has the essence of one of those chocolate oranges that you can buy around the holidays, a ball of chocolate segmented like an orange.  I just love the orange infusion in that ball of chocolate.  So, I tweaked the standard recipe here and there, with the addition of fresh orange zest as well as a little bit of the spice-rack version, and the batter smells so fresh and citrus-y (is that a word?) and I can not wait to see how they come out!  I used to have a tiny bottle of orange oil that my son Jeffrey gave me, and would have happily portioned out a drop or two for this cookie, but it has long run out and a new bottle has not yet appeared in my pantry (hint, hint, Jeff!).  If you do have orange oil,  use it sparingly, as it is quite strong.  Because this recipe uses melted butter, the batter is almost caramel-like and the cookies are extra chewy.  Baked in a slightly cooler oven (350 degrees F), these cook through gently, creating a soft but substantial cookie. I hope you like them!  I know Henry and Peter will, gratuitous photo follows (!):


In their Christmas PJs...


CHOCOLATE CHIP ORANGE COOKIES
oven:  350 degrees F
makes 3 - 4 dozen cookies, depending on how big you make them (I got 3 dozen 3" cookies)

2 bars butter, melted over low heat, and cooled
1 cup brown sugar, light or dark (I used dark since that's all I had)
1/2 cup granulated sugar
1 teaspoon vanilla extract
1 tablespoon freshly grated orange zest
1 teaspoon dried orange zest (if you have it) or 1/2 tsp. orange oil
2 1/4 cups all purpose flour
1 teaspoon baking soda
1 teaspoon salt
2 cups semi-sweet chocolate chips

Orange sugar:  1/4 granulated sugar tossed with 1 tsp. freshly grated orange zest, mixed with fork until completely combined

Into cooled but still melted butter, stir in brown and granulated sugars.  Pour into mixing bowl.  To that, beat in 2 eggs, one at a time, the vanilla, and the orange zest.  Add flour, baking soda, and salt, and mix on low speed (or with wooden spoon) until completely combined.  Stir in chocolate chips.

On parchment-lined cookie sheet, drop dough by rounded tablespoonfuls 2 inches apart (I use a small cookie scoop and get 3 across, 5 down on a half-sheet pan).  Gently press each cookie with two fingers to level them out a little.  Sprinkle each with just a little orange sugar.  Use your finger to evenly spread sugar over top of cookie.

Bake for 12-14 minutes or until bottoms just begin to brown and top looses its wet look.

Remove pan to cooling rack.  After a few minutes, move cookies to their own cooling rack to completely cool.

Start to finish!  All but the eatin'!  (Click to enlarge)


Photos:  my own

Post script:  They're out of the oven, and they are incredible!!!!

Wednesday, November 30, 2011

Mini Chocolate Wedding Cake with Buttercream Frosting

Tonight, at a small Italian restaurant near Congress Park in Saratoga Springs, a lovely couple will be celebrating their marriage.  A mutual friend, Chris, asked if I would bake a mini wedding cake for the celebration.  I was very happy to do so.  This is a dark chocolate cake with buttercream frosting (the same chocolate cake recipe I always use, as well as my standard buttercream frosting) -- two 8" layers of cake, filled and frosted in snowy white-on-white.  I barely dusted the roses with edible silver glitter.  It's so fine it will only show up if the light hits it just right.  Here's to a happy marriage and long life together for the newlyweds!


Mini chocolate wedding cake with buttercream frosting

Tuesday, November 29, 2011

Gingerbread Snowflake Cookies

Here's my first cookie recipe for the season - gingerbread snowflakes!  It's a very pretty cookie, piped with royal icing.  You can use a number of cookie cutters to achieve the snowflake look -- star, flower, scalloped, circle -- just pipe the icing as I did in the photo, and you have your own unique snowflakes.  No two are alike, you know!  Of course, you can make this dough into any shape you like, especially gingerbread men and women.  I like to make ornaments out of them by poking a hole near the top with a drinking straw before baking, and when cooled, tie with a ribbon and adorn your tree (a kitchen tree of just gingerbread cookies and metal cookie cutters is really cute).


GINGERBREAD SNOWFLAKE COOKIES
Oven:  350 degrees F

1/2 cup butter, softened
1/2 cup granulated sugar
1/2 cup molasses (not black strap)
1 egg yolk
1 teaspoon vanilla extract
2 cups all-purpose flour, sifted with:
1/2 teaspoon baking soda
1/2 teaspoon baking powder
1/2 teaspoon salt
1 teaspoon cinnamon
1 teaspoon ginger
1 teaspoon ground cloves
1/2 teaspoon nutmeg

In large mixing bowl, beat butter with sugar until light and fluffy.  Add  molasses, egg yolk, and vanilla; beat well.

In separate bowl, combine all the dry ingredients.  Stir into butter/molasses mixture until very well combined.  You might have to use your hands.  Be careful, I once burnt out a stand mixer's motor trying to mix this together.  Your hands are a great mixing tool.

Divide into 2 portions and wrap each in plastic wrap.  Refrigerate for at least one hour.

On lightly floured surface, with floured rolling pin, roll 1/4 inch thick.  Add more flour as necessary.  Cut with floured cookie cutters.  Re-roll scraps and keep going until you have used all the dough.

Bake 8-10 minutes on cookie sheet lined with parchment paper.  Cool on sheet for a few minutes then move to wire rack until completely cooled.

Pipe snowflake design with royal icing (recipe follows):

ROYAL ICING

3 tablespoons meringue powder (found in the baking aisle or in cake decorating section of craft store)
   (and safer than using raw egg whites)
4 cups confectioners sugar, sifted
6 tablespoons water

Beat the above ingredients together for up to 10 minutes, until soft peaks form.  Keep it covered with a damp paper towel to prevent a crust from forming on the icing in the bowl.

Pipe onto cookies using a pastry bag and a medium writing tip (or fill a heavy-weight zipper food storage bag with icing and clip a tiny piece off one corner.  This is your writing tip.  When done, close open end with a twist-tie.)

Let dry completely (overnight is good).

Photo:  my gingerbread snowflake cookies from Christmas '10

Sunday, November 27, 2011

Peppermint Bark Recipe

Photo:  acout.com
I'm putting together my Christmas list of gifty-type food to blog about, and to give.  I'm starting with Peppermint Bark, a beautiful combination of semi-sweet and white chocolates and peppermint.  It's very expensive to buy in a candy store, and so simple (and inexpensive) to make at home.  Make sure you use REAL white chocolate (just read the label) and not the "white confection" morsels or bars.  You're already saving money, making it yourself.  Buy the good stuff!


PEPPERMINT BARK
recipe from allrecipes.com


8 ounces high-quality semisweet chocolate, broken into pieces
2 teaspoons canola oil, divided
1/2 teaspoon peppermint extract, divided
8 ounces high-quality white chocolate, broken into pieces
25 peppermint candies, crushed

Lightly grease a 9x9 inch pan and line with waxed paper, smoothing out wrinkles; set aside.

Place the semisweet chocolate and 1 teaspoon of the canola oil in the top of a double boiler over just barely simmering water, stirring frequently and scraping down the sides with a rubber spatula to avoid scorching. When the chocolate is melted, stir in 1/4 teaspoon of the peppermint extract. Pour the melted chocolate into the prepared pan, and spread evenly over the bottom of the pan. Sprinkle half of the crushed peppermints over the chocolate layer. Refrigerate until completely hardened, about 1 hour.

Place the white chocolate and the remaining 1 teaspoon canola oil in the top of a double boiler over just barely simmering water, stirring frequently and scraping down the sides with a rubber spatula to avoid scorching. When the chocolate is melted, stir in the remaining 1/4 teaspoon peppermint extract. Pour the white chocolate directly over the semisweet chocolate layer; spread evenly. Sprinkle the remaining crushed candy over the top and gently press in. Refrigerate until completely hardened. Remove from pan; break into small pieces to serve.


Recipe source:  allrecipes.com:  
http://allrecipes.com/Recipe/peppermint-bark/detail.aspx 

Thursday, November 24, 2011

Happy Thanksgiving 2011!

Today is almost too busy to blog, but I'm going to take a few minutes to wish all my family and friends, and each and every reader, a very Happy Thanksgiving!

Thanksgiving is my favorite holiday.  I love the unloaded simplicity of this day, family and friends gathering together to share a meal and gratitude for the blessings in our lives -- abundance, not of things, but of family, friends, good food, and time together.

Today I am grateful for so much, especially my family, including my ex-husband Gene and his wife Kathryn who are hosting the big feast, but also for the friends who are another form of family to me.  I'm grateful for five healthy, beautiful, and now grown kids.  I am grateful for my two grandsons, for whom the sun rises and also sets (!).  I am grateful that Russ is here with me today, as he has been for the past fourteen Thanksgivings, along with his little dog Jette.  I am grateful for Skidmore College, the place where I have been employed since "the beginning of time" and also where my daughter Katie and I received degrees, and where my other children have taken classes from time to time. It is also a place where deep friendships have blossomed, a true blessing in my life.

I am grateful for memories of life lived, even the sad memories, because everything we experience is a lesson allowing us to appreciate all the good that comes our way, and the people who were there for us during the trials and tribulations, and also there to share our celebrations.  It may seem funny to say this, but I am grateful for facebook, because it has renewed friendships that had slipped from my grasp and brought old friends back into my life.  The power of social media...

I usually write about food, but Thanksgiving is about so much more than that.  So no food notes in this posting, just gratitude.

I wish all of you a truly Happy Thanksgiving.  May we appreciate all that surrounds us, and give thanks for every person who has touched our lives.

Now go eat!

Tuesday, November 22, 2011

Pumpkin Bars with Cream Cheese Frosting

A lot of people have tomorrow off, but I'm not one of them.  Half our office has taken the day, so for the rest of the staff, I'm baking a little special something:  pumpkin bars with cream cheese frosting (surprise!).  They're in the oven now with just a few minutes to go, and they smell soooooo good!  I can't think of anything more appropriate for the day before Thanksgiving than pumpkin bars.  They're spicy, sweet, and the perfect, deep, dark autumn color.  What more could you ask for than something that can do double-time as either a breakfast bar or, later in the day, dessert?  This recipe is adapted from one that Paula Deen has posted on-line.  My changes:  a little less oil, a little more cinnamon.  Paula's frosting is a little too rich for what I am looking for, so I cut the fat in half and no one will miss it.  Here's my take on Paula's pumpkin bars, with a preview of some photos along the way (frosting will have to wait until tomorrow morning!):

Look at those specks of cinnamon ~ it's just plain pretty!

And here they are, frosted and ready for my office!


PUMPKIN BARS WITH CREAM CHEESE FROSTING

Preheat oven to 350 degrees F

Prepare 13x9 pan (spray with vegetable spray or line with parchment paper and still spray a little)

Ingredients:
4 eggs
1 2/3 cups granulated sugar
3/4 cup vegetable oil (Paula uses 1 cup)
1  15 oz. can pumpkin
1 teaspoon vanilla extract

2 cups all-purpose flour
2 teaspoons baking powder
1 tablespoon cinnamon
1 teaspoon baking soda
1 teaspoon salt

In large mixer bowl, beat together eggs, sugar, oil, pumpkin, and vanilla extract until fluffy.
In separate bowl, stir all dry ingredients together.  Add to pumpkin mixture and mix until very well combined.

Spread in 13x9 pan and bake for 30 minutes.

Cool completely before frosting (a few hours or even better, over night).

Frost in pan.  Cut into bars.

FROSTING (very modified from Paula's - much more my own):

1/2 bar cream cheese (4 oz.) softened - make sure it's room temperature or it'll be lumpy...
1/8 lb. butter, softened (half a stick)
1 teaspoon vanilla extract
1/2  teaspoon lemon extract (optional)
2 cups confectioners sugar
a few tablespoons of milk, more if you need it

Beat softened cream cheese and butter until complete combined.  Add vanilla and lemon extracts and mix thoroughly.  Gradually add confectioners sugar, alternating with a little milk at a time, until it's the consistency you want it to be.  Less milk = a firmer frosting, more = softer.  Go sparingly with the milk.  Add a few drops at a time until it's just right. (Remember, you can always add a little more milk, but once you've added too much, you can't take it out.)


Photos and Collage:   my own

Saturday, November 19, 2011

Shortcuts to an Easier and Very Delicious Thanksgiving

I'm not hosting Thanksgiving this year.  It hasn't been "my" holiday to host in many years.  I think the last one was  Thanksgiving 2001, the year before we lost our mom.  After that, I let different people take over.  Most recently, either my daughter Katie or my ex-husband Gene and his wife Kathryn have hosted, and it's been very nice.  Still, I can't help wanting to read recipes for this special day.  I think about what I would serve, or what I can contribute.

This year, Gene and Kathryn are hosting and my contribution is stuffing.  I'd always been a "Pepperidge Farm" devotee when it comes to stuffing.  We grew up enjoying it.  I'm going to make it my own this year by adding a few traditional ingredients, including chicken stock, sauteed onions and celery, and also some plumped-up dried cranberries.  I thought about adding walnuts, but there are a lot of people coming to dinner, and nuts are an "iffy" thing when you're serving a crowd.  So, yep, I cheat a little bit - no stale, cubed bread, no giblets, no Bell's seasoning -- and the results will be as good or better than any totally from-scratch recipe.  Pepperidge Farm makes a great stuffing, seasoned perfectly,  a success every time.  I can't wait for left-overs to make my Thanksgiving sandwich:  layers of sliced turkey breast, stuffing, lettuce, and cranberry mayo between two slices of whole wheat bread.  YUM!

One of the very best short-cuts is a recipe given to me by Jody Shepson, two Thanksgivings ago.  It's a recipe for make-ahead gravy and I wrote about it in 2009.  If you really want one thing that's going to cut down on stress and make your Thanksgiving day, this one is it:  Click here for the link to fool-proof Make Ahead Gravy...

If you want to get your mashed potatoes out of the way ahead of time (or if you're bringing them to someone else's house), try making Mashed Potato Casserole (link here) - it's from Cook's Country and Katie and I made it last year.  It's great, and easily portable!

Another short-cut I allow myself at holiday time is using Pillsbury Pie Crusts - an incredible time and mess saver.  They're great, too.  So if the thought of mixing pie crust dough, chilling it, rolling it out, and getting it to fit the pie plate and stay in one piece is freaking you out, then buy a couple boxes of Pillsbury's pie crust.  It's great and you won't be sorry.  I usually make a couple of easy pies for Thanksgiving, too.  One is pumpkin, the other chocolate cream.  My pumpkin pie recipe is a short-cut as well.  I buy Libby's Pumpkin Pie Mix, a can of pumpkin already spiced with the perfect amount of cinnamon, nutmeg, and cloves.  All you add is evaporated milk and eggs, mix gently, and pour into a pie crust, and bake.  Simple as can be, and when served with real whipped cream -- heavenly!

For my chocolate cream pie, (my family's traditional favorite) I use cooked chocolate pudding - 2 boxes makes one nice pie.  I pre-bake a Pillsbury pie crust or you can buy an Oreo crust ready to go.  Pour the hot pudding in, cover it in Saran Wrap, chill, and top with whipped cream prior to serving.  Classic.

Try one or a few of these time-and-stress savers, and enjoy your Thanksgiving along with everyone else!

Photo credit:  http://www.womansday.com/var/ezflow_site/storage/images/wd2/recipes/make-ahead-turkey-gravy-recipe2/279879-1-eng-US/Make-Ahead-Turkey-Gravy-Recipe_slideshow_image.jpg

Friday, November 18, 2011

Citrus Chrysanthemum Cake

Tonight I baked a pound cake in a bundt pan, but it's not just any pound cake, and not just any bundt pan.  It's a citrus poundcake, with lemon extract and grated orange rind.  The pan is in the shape of a chrysanthemum flower, a gift from Russ a few Christmases ago.  He's a smart man.  He knows if he gives me something to bake with, he'll be able to enjoy the results!

Here's the recipe for tonight's Citrus Chrysanthemum Cake (makes enough batter for one bundt cake and a dozen cupcakes).  This is a perfect early morning coffee cake, or a great dessert after dinner (with a little ice cream or sherbet and whipped cream!)...  It would nicely complement traditional Thanksgiving desserts, as well.  Citrus flavors are very refreshing after a big meal.

I hope you try it!

CITRUS CHRYSANTHEMUM CAKE

1 bar unsalted butter, softened
2 cups sugar
4 eggs
2 cups (one pint) sour cream
1 teaspoon vanilla extract
1 teaspoon lemon extract
1 tablespoon grated orange rind (dry) or 2 tablespoons fresh
3 1/4 cups all-purpose flour
2 teaspoons baking powder
2 teaspoons baking soda
1 teaspoon salt

Glaze:  1 cup confectioners sugar, 1/2 tsp. lemon extract, water
Additional confectioners sugar to sift over glazed cake

Preheat oven to 350 degrees F

Prepare pan:  grease very well or spray with Pam

In large mixer bowl, cream butter with sugar until very well combined.  Add extracts and orange rind.  Add eggs, one at a time, beating well after each addition.  Add sour cream.  Mix well.

In separate bowl, mix together flour, baking powder, baking soda, and salt.  Add to butter/egg mixture and beat until very well combined.

Fill bundt pan 2/3 full.  Bake at 350 degrees F until cake tests done.  Check at 45 minutes and continue baking until top is dry and bounces back when lightly pressed.  Remove from oven.  Cool in pan for 10 minutes.  Turn out onto wire rack to cool completely.

Make glaze - stir confectioners sugar and lemon extract and stir in water, a few drops at a time, to get a pourable glaze.  Pour glaze over cake.  Sift confectioners sugar over top of cake.

Bake cupcakes for 22 minutes or until they test done.  Cool completely.  Frost as desired.

Thursday, November 17, 2011

Birthdays, Red Lobster, and Cupcakes

Tonight we celebrated my brother Michael's (belated) birthday with a dinner at Red Lobster in Queensbury.  My family loves Red Lobster for birthday celebrations because we can fit six siblings around a table easily (missing 7th sib,  brother Danny, who relocated back to California with his wife Suzette last March). At RL, we can enjoy a good meal (very good, actually), and sit and hang out with each other long after our check is paid. That's just what we did tonight.  It's a comfortable place for a group like us.

I've written about these birthday dinners before.  They are special.  Here we are, now realizing that we are actually getting older, and there's no denying it -- the oldest O'Farrell brother is 63, and the youngest sister, 53.  When did that happen?  It seems like just yesterday we were seven kids living together in the same house with our parents, a large, cohesive family.  So much has happened over the past 40 years or so -- college, military service, marriages, babies, dogs, moving away, moving back, babies becoming kids, kids becoming teenagers, new relationships, more dogs, kids getting married, more babies...  It's such a flash of events that pop like firecrackers in my brain, moments of life creating a collage of memories to pour over again and again, and savor.

Through all of these transitions, the one constant has been our relationship as siblings, with all that comes with big families.  Sometimes it's easy; sometimes it's not, but it's always been something we can count on.  My brothers and sisters and I have been through a lot together -- moving a lot as kids, growing up and staying connected, losing our father, and later our mother.  We were mid-life adults with no parents, with still half our lives to lead, six siblings to support each other through happy and sad times.

When you think about it, no one has known you longer or better than your sisters and brothers, the people who know everything about you, and, like the saying goes, "love you just the same."

I appreciate the fact that I have six siblings.  They are a great bunch.  Hope you had a happy, happy birthday, Michael.  I look forward to sharing many more together, and...I hope you like the cupcakes!

Sunday, November 13, 2011

Ellen's Stardust Diner and Popeye Spinach Salad

Popeye Spinach Salad
from Ellen's Stardust Diner in NYC

I slept in this morning (all the way to 8:00 am!) after spending a great day in New York City with my friend Catherine Golden.  Catherine is a professor of English at Skidmore College and had invited me to join her and a bus-full of Honors Forum students on a day trip to the city to see the play Avenue Q.  Our bus left campus at 7 am and arrived in New York just before 11 am, so there was plenty of time to sight-see and shop before and after the play.  We were dropped off at Bryant Park, right behind the NewYork Public Library.  Catherine and I started off by window shopping (and actual shopping) at Bryant Park where vendors are set up all around the skating rink.  There's a wide variety of crafts and goods for sale there, with international food vendors as well.  I bought hand puppets for Henry and Peter, a pirate for Henry and Stuart Little for Pete (can't wait to give them to them this morning!).  Moving on to the New York Public Library, we were so excited to see a display of the actual toys that were the inspiration for A.A. Milne's Winnie the Pooh stories.  In addition, we saw pages from Virginia Woolf's last journal as well as her walking cane, and also a display of items belonging to Malcolm X, including pages from the journal of his trip to the mid-east, and his briefcase.  I took a photo of Catherine outside the library, as well as pictures of the stately lion sculptures guarding the entrance.  


New York Public Library

Before the play, we stopped for lunch at Ellen's Stardust Diner on 51st Street.  Though the line waiting to get in was wrapped around the building, we were happy to wait and were seated in about half-an-hour.  It was jam-packed, with tables butted right up against each other, but that just added to the fun.  Aspiring Broadway stars/waitstaff belt out tunes as they work, the epitome of multi-tasking!  Each and every "performance" is amazing, and last month alone nine of their staff were plucked away from the restaurant to perform in theaters on- and off-Broadway.  Having lunch at the Stardust is like a free pass to a wonderful show, and all you have to pay for is lunch (thank you, Catherine!), which for both Catherine and me was the Popeye Spinach Salad.  It was a plate full of the freshest spinach, candied walnuts, sliced pears, dried cranberries, the creamiest goat cheese, with a delicious sherry vinaigrette (I have to get that recipe!).  I had sliced chicken added to mine.  We were in and out in time to get to the play, the theater just two blocks from the diner.

Ellen's Stardust Diner!

Avenue Q was very entertaining.  It's a play set in a poorer neighborhood in the city, where most of the characters are puppets dealing with life's challenges (unemployment, relationships, personal identity, race, cultural differences) and it does so with incredible humor (sometimes raunchy to a PG-17 level!) and sharp and witty insight.  The actors/singers put on a wonderful show and interact with the audience, making it even more fun.  It was almost three hours long but it was so fast-paced that I never once looked at my watch.  Everyone left there smiling and singing!


When we left the theater, it was dark (at 5 pm!) and the perfect opportunity to catch New York's beautiful lighted landscapes with my little Canon camera.  We slowly walked the city blocks back to Bryant Park where we each grabbed a Turkish square pastry to go, made of filo dough, spinach, and cheese, and nibbled on those as we waited for our bus.

It was an easy, comfortable day enjoying one of the world's greatest cities, the place where both my parents were born over 90 years ago, and as our bus pulled away, I caught a glimpse of the illuminated skyline and said to myself, once again, "I love New York!"


Thursday, November 10, 2011

Pecan Pie

Pecan Pie from the
Food Network Kitchens
In honor of my mother's birthday, I'm posting a recipe for pecan pie.   Virginia McGeehan O'Farrell was born on November 10, 1918.  She lived until April of 2002, and the world just hasn't been the same since.  While I am, of course, very sad that my mother is no longer with us, and I miss her every day, I am also happy when I think of the funny things she used to say.  She was a little woman, "five-foot-two-and-eyes-of-blue," with a great sense of humor.  My kids were so fortunate to have had her in their lives for most of their growing up years.  I'm very grateful for that.

I've written before about the foods my mother used to make for us - classics like tuna casserole and meatloaf.  She was a simple cook, and we really enjoyed everything she served us.  I'm not sure she enjoyed cooking so much, day after day -- feeding a family of nine was a chore no matter how you look at it.  She'd often say the thing she liked to make the most was reservations!  Maybe that's why we, her grown children, really love to eat out.

There were certain foods my mom especially liked.  I remember she loved maple walnut ice cream, or sometimes pistachio.  She loved nuts.  She liked lady fingers.  I remember odd things about specific foods -- my mom liked the corn relish at Wally's of Greenwich, a restaurant she used to go to with her friends, Blanche and Betty.  She loved the Olde Daley Inn in Troy, especially the salad bar, but also the out-of-shell crab dish. My mom, little woman that she was, could build a salad like nobody's business!

In honor of my mother's birthday, here's a recipe for pecan pie, one of her favorite desserts!

PECAN PIE
recipe from the Food Network Kitchens
Dough:
1 1/4 cups all-purpose flour
2 teaspoons sugar
1/8 teaspoon salt
1/2 cup cold butter (1 stick), diced
1 large egg, lightly beaten
Flour, for rolling the dough

Filling:
5 tablespoons unsalted butter
1 cup packed light brown sugar
3/4 cup light corn syrup
1/2 teaspoon fine salt
2 cups chopped toasted pecans
1 to 2 tablespoons bourbon
2 teaspoons pure vanilla extract
3 eggs, lightly beaten

Directions
Make the dough by hand: In a medium bowl, whisk together the flour, sugar, and salt. Using your fingers, work the butter into the dry ingredients until it resembles yellow cornmeal mixed with bean-sized bits of butter. (If the flour/butter mixture gets warm, refrigerate it for 10 minutes before proceeding.) Add the egg and stir the dough together with a fork or by hand in the bowl. If the dough is dry, sprinkle up to a tablespoon more of cold water over the mixture.

Alternatively, make the dough in a food processor. With the machine fitted with the metal blade, pulse the flour, sugar, and salt until combined. Add the butter and pulse until it resembles yellow cornmeal mixed with bean-sized bits of butter, about 10 times. Add the egg and pulse 1 to 2 times; don't let the dough form into a ball in the machine. (If the dough is very dry add up to a tablespoon more of cold water.) Remove the bowl from the machine, remove the blade, and bring the dough together by hand.

Form the dough into a disk, wrap with plastic wrap, and refrigerate until thoroughly chilled, at least 1 hour.
On a lightly floured surface, roll the dough with a rolling pin into a 12-inch circle about 1/8-inch thick. Transfer the dough to a 9-inch pie pan and trim the edges, leaving about an extra inch hanging over the edge. Tuck the overhanging dough underneath itself to form a thick edge that is even with the rim. Flute the edge as desired. Freeze the pie shell for 30 minutes.

Set separate racks in the center and lower third of oven and preheat to 400 degrees F. Put a piece of parchment paper or foil over the pie shell and fill with dried beans or pie weights. Bake on a baking sheet on the center rack until the dough is set, about 20 minutes. Remove from the oven and lift sides of the parchment paper to remove the beans. Continue baking until the pie shell is lightly golden brown, about 10 more minutes. Reduce the oven temperature to 350 degrees F.

While the crust is baking make the filling: In medium saucepan, combine the butter, brown sugar, corn syrup, and salt. Bring to a boil over medium heat, and stirring constantly, continue to boil for 1 minute. Remove from the heat and stir in the nuts, bourbon, and the vanilla. Set the mixture aside to cool slightly, about 5 minutes. (If the crust has cooled, return it to the oven for 5 minutes to warm through.) Whisk the beaten eggs into the filling until smooth. Put the pie shell on a sheet pan and pour the filling into the hot crust.
Bake on the lower oven rack until the edges are set but the center is still slightly loose, about 40 to 45 minutes. (If the edges get very dark, cover them with aluminum foil half way during baking.) Cool on a rack. Serve slightly warm or room temperature.

Copyright 2001 Television Food Network, GP. All rights reserved


Wednesday, November 9, 2011

Eventful...

Oh, my ADK Baker followers, I've missed you!  Over the past two weeks, I've been very busy at work and also in my personal life.  After my car was totaled in a head-on collision with a drunk driver, I've been especially busy with insurance policies, car shopping, and financing a new car.  Car-related things are winding down, and I am now driving a Jeep Patriot, better suited to the rigors of a northeast winter and the challenges of an ice and snow covered driveway.  It's a bit of a silver lining in an otherwise very frightful experience.


Old and New

Jeep meet driveway/driveway meet Jeep

To think about things other than cars, totaled and new, I always turn to baking.  Last weekend I baked quite a bit, and have this collage of the cinnamon rolls, scones, and muffins that I put together Saturday afternoon.

Baking Frenzy

Pete the blue dragon, and Henry, the "space rocket ship"

To add to the drama of the past two weeks, mother nature decided to gift us with a little pre-season snow storm.  While I absolutely dreaded the thought of winter driving with my Mazda, I am actually looking forward (did I say that?) to the first real snowfall to see just how well my Jeep handles the white stuff...


Winter, you're early.  Come back later...

When life gives me lemons, I don't make lemonade.  I bake (and take pictures!)...

I won't stay away so long again, promise!

Sunday, October 30, 2011

Julia's Strawberry Shortcake Birthday Cake

Earlier today I delivered a birthday cake to 3-year old Julia, whose party was this afternoon. Julia's mom, Rebekah, is a former neighbor of mine and, along with her sister Robyn, has been friends with my own kids since they were all pretty little.  They all grew up together in a quiet neighborhood in rural Greenfield Center, New York, and all the (now grown) kids seem to have fond memories of those years, from kindergarten right through high school.  It was a neighborhood where kids could stay out all day long and no one ever had to worry.  I used to call my kids in for lunch and dinner, and then they played outside until it was time to come in for the night.  They loved it.

Rebekah asked if I could make a Strawberry Shortcake birthday cake for  Julia's birthday party, and sent me a photo of her "inspiration" cake, which I attempted to replicate but also add my own touches.  For this cake, I baked an 8" tier and a 6" tier of yellow pound cake.  Layers were filled with pink vanilla buttercream with just a bit of raspberry flavoring (extract).  I carved the 6" inch cake  into the strawberry house shape, crumb coated both tiers, and then started to decorate.  The finishing touch was a little Strawberry Shortcake doll (that I had searched a number of stores to find!) perched at the bottom of the cake.  A few fondant flowers for trim, and Julia's cake was complete.

Here is a collage of photos of Julia's cake:

Sunday, October 23, 2011

The Making of a Barn Cake

For Pete's first birthday party, Katie asked if I could make a barn-yard cake.  Researching wasn't too satisfying, because I couldn't find an image that matched what I had going on in my brain.  I wanted something quasi-authentic, not too cutesie (event though Pete is VERY cutesie!) and I didn't want something terribly out of scale. Many of the cakes I found on-line had barnyard animals that seemed like giant specimens next to a little barn.  Hmmm.  Well, I baked a big rectangle of yellow/chocolate marble pound cake, and sliced it into thirds.  I thought I'd stack the three sections and see what would come of it.  This cake was designed as I went, which is a gamble for something as significant as my own grandson's first birthday bash...  Anyway, it all came together better than I could have ever hoped, with a little fondant, a little food coloring, and a little imagination.  I was at a loss about the roof, and then I thought of slate shingles, and made my own shingle strips with fondant and overlapped them, resulting in a pretty  neat roof.  As it came together, it seemed a little impersonal -- where would I ever write "Happy Birthday Pete"?   Then I thought of old advertisements I used to see on the side of barns, like a road-side billboard, and decided that the back of the barn was the perfect place for the greeting.

In the end, I didn't make barn yard animals.  Henry's toy barn had all the appropriately-sized livestock (plastic stock?!) this little barn needed.  Accessorized with Katie's owl and pumpkin cupcakes, and my own haystack cupcakes (with fondant pig butts peeking out!) we ended up with a pretty nice barn yard cake to ring in Pete's second year!

In case you think that the party was all about cake, you should know that there was quite a feast beforehand. Bill and Katie hosted grandparents and friends for a pig roast (because you know all one-year-olds want one!) and I just had a hard time looking at the pig.  I knew it was being roasted.  I know that I am a hypocrite because I buy deli-sliced ham and bacon, but the immediacy and reality of THAT pig roasting outside of our house just kinda made me feel bad, and though I don't want to get into a debate about why this does and should bother me, let me just say that I love the movie "Babe" and I won't be able to watch it with Henry, not for a while...

Following are photos of the party, followed by pics of the making of Pete's cake.  Hope you enjoy!


Click to enlarge

And here are photos of the creation of Pete's birthday cake:


Pete had a terrific first birthday party.  Hope you enjoyed reading about it!