Monday, February 25, 2013

Scampified Shrimp Over Smashed Cauliflower

A recent purchase of a pound of large shrimp at my local Hannaford market's fish counter inspired tonight's dinner. The shrimp was wrapped in brown paper and in my freezer for a week, then thawed in my fridge for a day. I had to make something with it tonight. This shrimp happened to be pre-cooked, but you can make this dish with raw shrimp since it cooks in just minutes.

Here I was with this pound of beautiful shrimp, thinking, "What I'd REALLY like to do with this is..." make scampi.  But linguini is not on the low-carb menu.  Rats. I also thought about the shrimp and cheddar grits I had at a great restaurant in Disney World a few years ago. Well, if you look around and see this house, literally sitting in the middle of a northeast forest, you'd probably figure that there are no grits in my pantry, and besides, they're pretty carb-y. I did love the presentation of that meal, shrimp on skewers sitting atop a mound of grits. So I thought, why not make a mound of smashed cauliflower, seasoned and pureed, and put some scampified shrimp on top of that? The flavors of olive oil, butter, garlic, lemon, and white wine are magical together. Well, I have to tell you, it worked. I used a dozen of those shrimp for the scampi, and six for shrimp salad for tomorrow's lunch.  Dinner was DELISH! And it took no time at all!

SCAMPIFIED SHRIMP OVER SMASHED CAULIFLOWER
Serves 2 (maybe)

Make smashed cauliflower:
1 lb. frozen cauliflower florets
4 tablespoons low-fat or non-fat sour cream
2 tablespoons shredded Parmesan cheese
salt and pepper to taste

Cook cauliflower (steam or cook in an inch of boiling water, covered) 8 minutes or until fork tender.
Drain cauliflower. Then pour out onto clean dish towel and squish to get all the excess water out.

In blender, place cauliflower, sour cream, parmesan cheese, salt, and pepper. Puree, stopping to move it around and continue to blend until it is all incorporated and smooth. Add a little milk (a tablespoon at a time) if it seems too thick, but it will probably be fine without it.

With a spatula, spoon out into a heat-proof bowl and cover with a plate to keep warm while making the shrimp (or microwave for 30 seconds to 1 minute when the shrimp is ready).

While the cauliflower is cooking, start shrimp:

1/2 lb. large shrimp, cleaned and de-veined (I used pre-cooked)
1 tablespoon olive oil
1 tablespoon Smart Balance or butter if you prefer
1 teaspoon minced garlic
1 tablespoon freshly squeezed lemon juice
1/4 cup good white wine
1 teaspoon cornstarch mixed with 2 teaspoons cold water until dissolved

Another tablespoon of shredded Parmesan cheese for garnish

In skillet over medium heat, melt butter in olive oil. Add minced garlic and cook until garlic gets toasty but not too brown (mine got a little too toasty!). Add lemon juice and wine. Heat to bubbling. Add cornstarch mixture and stir, cooking until slightly thickened. Add shrimp and heat through, for a couple of minutes over low heat, turning shrimp half-way through. If using raw shrimp, cook until opaque and cooked.  It just takes a couple of minutes.

Pour shrimp and sauce over smashed cauliflower, sprinkle with grated Parmesan, and enjoy this healthy version of an otherwise decadent favorite!

And here's the shrimp salad for tomorrow's lunch (shell-fish overload!)


Cut up shrimp, celery, canola mayo and lots of pepper.  That's it.

So, there you go.  Shrimp for dinner, and for lunch!

Enjoy!


Sunday, February 24, 2013

A Healthy(er) Double-Chocolate Cupcake!

OK, I just had to get back to baking; after all, this is the Adirondack Baker! For those looking for a healthy(er) dessert option, here's a recipe for a double-chocolate cupcake that can provide a sweet ending or snack without undermining your efforts at eating well.

This recipe is one I adapted from Cooking Light. Their version uses all-purpose flour, butter and granulated sugar. I decided to healthify (is that a word?) this recipe to another level by using whole white flour, brown sugar, and canola oil. I chose to melt the additional dark chocolate rather than give it a fine chop, and I also added a teaspoon of cinnamon because Shannon, my nutritionist, tells me that cinnamon is a wonderful spice to add to any diet, that it's great for the bloodstream. It compliments chocolate in a very simpatico way (like my south-of-the-border reference?).

Since I'm still in carb-detox mode, I won't be enjoying these cupcakes just yet, but my family will.  This recipe makes 1 dozen cupcakes, just enough for a big family dinner or for making your co-workers very happy! One or two might make it to my freezer, for that time when I am able to handle an occasional (and healthier) treat!

HEALTHY(ER) DOUBLE-CHOCOLATE CUPCAKE
12-cup standard muffin pan, with paper liners
Preheat oven to 350 degrees Farenheit

Ingredients:
1 cup whole white flour (I use King Arthur), MINUS two tablespoons (whole white absorbs more moisture than AP flour)
1/3 cup cocoa powder (I use Ghiradelli)
1 teaspoon baking soda
1 teaspoon cinnamon
1/4 teaspoon salt

1/2 cup brown sugar, light or dark, firmly packed
1/4 cup canola oil

1/2 cup egg substitute (I used 1 large home-grown egg, and 1 egg white)
1 teaspoon vanilla extract
2 oz. dark chocolate, melted in microwave

1/2 cup low-fat buttermilk (I use Battenkill low-fat milk and 1 tablespoon vinegar - let sit for a minute or two)

Directions:
In medium sized bowl, whisk together flour, cocoa, baking soda, and salt.  Set aside.

In large mixing bowl, mix brown sugar and canola oil very well, until there are no lumps left.  Add egg and beat well (if using real eggs, beat well after each addition).  Add vanilla extract and melted chocolate, and mix very well.  Beat this mixture at high speed for a good minute.

With mixer at lowest speed, add flour mixture alternately with milk, 1/3 each at a time, mixing well after each addition.  Then beat for one more minute.  Scrape bowl to make sure you got it all incorporated.

Fill muffin cups 1/2 to 2/3 full, using all the batter for 12 cupcakes.

Bake for 18 minutes or until cupcakes test done (toothpick comes out clean, or cake bounces back when gently pressed in the center).  I always use the "press" test.

Sift a little confectioners sugar over top, or frost as desired.  OR (!) frost with a chocolate ganache, also made healthier with eliminating the cream and melting the chocolate with just a tablespoon of canola oil.

HEALTHY DARK CHOCOLATE GANACHE

6 oz. dark chocolate, chopped (or use dark chocolate chips - I used Hershey's)
1 tablespoon canola oil

In microwave-safe bowl, heat chocolate with canola oil for 1 minute.  Remove (carefully - my bowl got hot) and stir with fork until all the chocolate has melted.  Mine took just one minute, if you need to put it back in the microwave, try another 20 seconds.

With a tablespoon, stream ganache over center of cupcake and let it spread, but not all the way to the edges.  You want some of that pretty cake to show through!


OK, now who gets them?!!!


Friday, February 22, 2013

Frozen Greek Blueberry Yogurt

The last time I used my ice-cream maker, our peaches were in season. That was almost three seasons ago! I had grand plans of using it all the time, but just never did. It's a terrific appliance and a very nice addition to my kitchen, so last night I decided to call it back to duty, this time for frozen blueberry yogurt. This recipe couldn't be simpler. I used my favorite, Cabot Vanilla Bean Yogurt, along with a quick blueberry sauce that came together in a few minutes on the stove. This frozen yogurt has a texture somewhere between an ice cream and an ice - it's frozen solid coming out of the freezer and needs to sit for about 10-15 minutes at room temperature for easy scooping, but it's cold, refreshing, with that yogurt "tang" that I love. It's your favorite yogurt, only frozen. It is like soft-serve coming out of the ice cream machine, and I think that's the perfect time to eat it! Whether you have it soft-serve-style or frozen through, it's a great way to eat yogurt.

The idea is to use the ice cream maker for healthier desserts, because, as much as we "all scream for ice cream," that's no longer an option for me. There's no reason my ice cream maker should sit idle when it it can help to make life a little cooler right now, and a lot cooler this coming summer!


FROZEN GREEK BLUEBERRY YOGURT

Blueberry sauce:
1 cup water
1 cup blueberries, fresh or frozen
sweetener to taste (1/2 up sugar or substitute to equal sweetness of 1/2 cup sugar)
2 tablespoons cornstarch dissolved in 4 tablespoons water
1/2 tsp. vanilla extract

Bring water to boil. Add blueberries and sweetener and bring to boil again.  Add dissolved cornstarch and reduce heat. Simmer on low heat until nicely thickened, like a thick pudding (just takes a minute or two). Remove from heat and stir in extract.  Let cool.

2 lbs. low-fat Greek vanilla yogurt  (I use Cabot Vanilla Bean)


While blueberry sauce cools, add yogurt to ice cream maker and freeze according to manufacturer's instructions. Half-way through, add a couple tablespoons of the blueberry sauce (saving the rest for folding in at the end.) Mine froze in just 14 minutes, so watch to see when it seems done and turn it off.

Spoon frozen yogurt (still fairly soft) into freezer-safe container and fold in as much of the blueberry sauce as you like, saving the rest for pancakes or another use.

Freeze for a few hours or overnight.

To serve, remove from freezer and allow to soften for 10-15 minutes before dishing out.  Serve with some of that warmed-up blueberry sauce!


Wednesday, February 20, 2013

Pepper and Onion Scramble

Just as the day starts, the questions begin. How am I going to give this day a great start? Because I am so necessarily focused on eating well, the standard morning fare won't suffice. Just can't do the English muffin with butter and grape jelly, or  bowl of Life cereal (which I do miss!). No pancakes right now, no waffles.  So, what's quick, easy, and delicious that's going to do the trick?

To maintain my interest for the long-term, this new eating plan has to have elements of excitement and variety. So, breakfast -- how do I take an egg and make it something worth looking forward to? On this morning, the answer was red peppers and onions, sauteed and scrambled into that egg. It is a very satisfying morning meal. Give yourself the 10 minutes it takes to get your morning off to a terrific start! The day will only be better because of it!


PEPPER AND ONION SCRAMBLE
spritz skillet with non-stick spray

1 tsp. olive oil
1/4 onion, sliced and coarsely chopped
1/4 red pepper, cut into 1/2-inch chunks
1 egg
1 egg white
salt and pepper
1 tablespoon grated Parmesan cheese, divided

Add olive oil to non-stick skillet and bring to a shimmer over medium heat.   Add chopped onion and red pepper and cook until pepper softens and onion begins to caramelize, just getting brown around the edges.  This might take 5 minutes or a few more.

Whisk egg and egg white together.  Pour whisked egg/egg white over onions and peppers and let cook until the egg is almost opaque but there's still a lot of moisture.  Season with salt and pepper to taste. Sprinkle with half the Parmesan cheese. Turn off the heat (best tip!) and, with wooden spoon, loosely scramble the eggs and allow to sit for a minute until all of the egg has set.

Spoon into serving bowl and sprinkle with the remaining Parmesan cheese.


Monday, February 18, 2013

Eggplant Parmesan Stacks (Baked, Not Fried!)

This recipe is one where I take a Favorite with a capital "F" food and modify it to fit with my new, healthier eating strategy. I have always loved eggplant parmesan, ever since that very first taste in Tina Loviza's kitchen back in the early '70s. Growing up in an Irish household, I had never had anything like it, and it's probably one of the first dishes that truly inspired my interest in cooking. Ever since then, if a restaurant menu offers eggplant parmesan, I usually order it! I've also made big pans of it for family parties over the years, always thinking of that first taste in Mrs. Loviza's kitchen!

So, how do you take something as delicious and rich and fried as this and make it healthier? Well, you start by not frying it. Instead of breadcrumbs fried in olive oil, this recipe has a baked-on coating of steel-cut oats whirled to a fine crumb in a blender with minced garlic and a little bit of parmesan. The addition of more veggies, and switching out the full-fat cheese for a mixture of part-skim and non-fat cheeses (melts better than non-fat alone), results in a nice facsimile of a pretty great meal.


BAKED EGGPLANT PARMESAN STACKS
Oven 425 degrees Farenheit
8x8 baking pan, sprayed with cooking spray
Cookie sheet lined with foil.  Spray foil.
Metal, oven-proof cooling rack placed over foil in cooking sheet.  Spray cooling rack.

Ingredients:

1 good-sized eggplant (how do you figure eggplant sizes?), peeled and sliced in 1/2-inch rounds.  Peeled eggplant is a lot easier to eat than unpeeled - my personal preference.  You'll need 8 rounds for this recipe.  Save remaining eggplant for other dishes.

Crumb coating:

1 large egg white beaten with 4 tablespoons water

In blender, mix together the following until a fine crumb is formed:

  • 1 cup steel-cut oats
  • 1 teaspoon minced garlic
  • 1 tablespoon grated parmesan cheese
  • 1/2 teaspoon pepper
  • 1/4 teaspoon salt

Cooking spray

Veggies:

  • 1 teaspoon olive oil
  • 1 red pepper, sliced in thin strips
  • 1 sweet onion, cut in 1/8ths 
  • 1 cup baby bella mushrooms, sliced (if you like mushrooms)


1 1/2 cups of your favorite spaghetti sauce

Cheeses, mixed together:

  • 1/2 cup part-skim mozzarella shreds
  • 1/2 cup non-fat mozzarella shreds
  • 4 tablespoons shredded Parmesan cheese


Put dish of egg white/water mixture on table, with dish of crumb mixture to the right of it, and prepared cookie sheet/rack to the right of that.  Line them up for easy assembly-line.

Use your left hand ONLY for dipping eggplant slices, both sides, in egg white mixture.  Drop into crumb mixture.  Use your right hand ONLY for spreading crumbs on both sides of dipped eggplant slices.  Placed crumbed slices on rack on cookie sheet.  When all slices are in place.  Spray tops with a spritz of cooking spray.  Flip over and spray other side.

Bake at 425 degrees F for 22 minutes OR until crumbs are beginning to brown nicely.  Remove from oven.

While the eggplant is baking, sauté veggies in olive oil over medium heat until softened and wilted.

Spread a couple of tablespoons sauce over bottom of baking dish.  Arrange 4 slices breaded eggplant to fit bottom of dish.  Spread a generous tablespoon of sauce over each slice.  Sprinkle 1 tablespoon cheeses over each.  Spoon sauteed veggies over slices. Sprinkle another tablespoon cheeses over veggies, and top with remaining slices of eggplant.  Generously spread remaining sauce over and between stacks of eggplant.  Divide remaining cheese over the tops of the eggplant stacks.

Cover with a piece of foil that's been sprayed (inside surface) with cooking spray.

Bake at 425 degrees Farenheit for 1/2 an hour.  Remove foil and let sit for a few minutes.

Serves 4.


Sunday, February 17, 2013

Cabot Greek Yogurt Parfait

Living so close to Vermont, I like to buy Cabot dairy products. This rural and New-Englandy part of New York State is just about 45 miles due west of the Vermont border, and it's an easy and beautiful drive to visit our Green Mountain neighbor. My daughter Katie turned me on to Cabot's products. She's a graduate of Vermont Law School and is very loyal to all things Vermont!

Cabot's cheeses are terrific, and their yogurts are just as good. I've been a fan of their Greek Vanilla Bean flavor, so much so that I buy it in the big, 2 lb. tub. Now that I am watching carbs like a hawk, I decided to try Cabot's plain Greek yogurt, and bought it this week, also 2-lbs. worth. There are many recipes where plain yogurt can stand in for sour cream, with less fat and more nutrition.  I have to be careful with the vanilla bean variety, because I love it so much I could eat it like ice cream. It hits the spot when you're looking for something cold, sweet, and creamy.

In an effort to re-train my tastebuds to a less-sweet focus, the plain can be used in a number of ways. This morning, it takes center stage as the star of a breakfast (or anytime) parfait. It is joined by sliced strawberries, frozen and unsweetened blueberries, and a little bit of crunchy granola. I added a bit of sweetness to the plain yogurt with Domino's sugar/stevia blend (just 5 calories a packet) and citrus flavor with freshly grated lemon rind and lemon extract. Layered in a pretty glass, this parfait is a great way to say "Good morning!"

CABOT'S GREEK YOGURT PARFAIT

1 cup Cabot Plain Greek Yogurt
1/2 teaspoon grated lemon peel (if you have a lemon!)
1/2 teaspoon lemon extract
2 packets sweetener of your choice
3 large strawberries, sliced
3 tablespoons frozen unsweetened blueberries (or fresh, if you have them)
3 tablespoons granola (I used Post Grape-Nuts Fit granola cereal, because I have it on-hand)

In mixing bowl, combine yogurt with lemon peel, sweetener, and extract.  Set aside.
In clear glass with at least 1-cup capacity, layer yogurt, berries, granola (1/3 of each per layer).

Admire this pretty and very healthy parfait, and enjoy!


Saturday, February 16, 2013

Baked Eggs with Swiss and Canadian Bacon

This morning, I'm baking eggs.  Yep, baking.  This adds a new dimension to my egg repertoire, and a nice change of pace from the typical.  This recipe for two, with eggs, Swiss cheese, and Canadian bacon, is so simple.  It's a great start to my low-carb weekend!  You could change this up with different cheeses, or regular bacon.  If you want to add a nutritional boost, start with a spoonful of sauteed spinach and onions!  (I'll try that next time.)


BAKED EGGS WITH SWISS AND CANADIAN BACON
Preheat oven to 350 degrees Farenheit
Spray two 4 oz. ramekins with cooking spray

2 eggs
2 slices Canadian Bacon
2 thin slices Alpine Lace Reduced-Fat Swiss Cheese (about 1 oz. total)
2 tablespoons non-fat milk
salt and pepper to taste

Break eggs into ramekins.  Top each with 1 tablespoon milk.  Cut bacon and cheese into small pieces.  Toss together.  Divide and sprinkle half over each egg.  Season top of each with salt and pepper to taste

Place ramekins on baking tray and bake for 15-18 minutes or until whites are opaque and yolk is the way you like it.  Check yolks with a butter knife as you get close to the 15-minute mark.


Pete, my kitchen helper (?)...


Wednesday, February 13, 2013

Parmesan Crisps

One of the universal questions asked when dieting: "What can I eat?" When we're so used to grabbing the same snack thing for years, and then suddenly have to change that automatic response, it takes a little re-wiring.  My go-to snack for years was Cheez-its. I just LOVE them. But with the carb detox that I'm currently following, those little squares of cheesy goodness are cracker-non-grata, and I've found a fine, carb-FREE substitute: Parmesan crisps! The recipe couldn't be easier with just one ingredient, shredded Parmesan cheese. The powdered green "shaker cheese" (that's what my kids always called it) won't work. This calls for the real deal. I buy the canister of real Parmesan in the imported cheese section of the grocery store, often found near the deli and NOT on a shelf in the pasta/sauce aisle!

Six crisps, just 125 calories and 0 carbs, is a truly satisfying snack. It takes just six minutes in the oven, let them cool, and enjoy. They have a chewy texture and a slightly salty taste that really takes care of a snack attack. At just one level tablespoon of cheese per crisp, they are about 2-inches in diameter with a lacy appearance. I can imagine these as a pretty dish on a table of appetizers. Because they are warm and flexible coming out of the oven, they can be molded into cups (mini muffin tins) and when cooled, filled with chicken, egg, or tuna salad, hummus, any other low-carb filling. Try them and let me know what you think!

PARMESAN CRISPS
Oven 350-degrees Farenheit

Line cookie sheet with parchment paper.  Spray paper with non-cook spray.


6 tablespoons shredded Parmesan Cheese

Using level tablespoons, drop Parmesan cheese in mounds 2-inches apart on cookie sheet (3 across).

Bake for 6 minutes or until outside edges get golden brown and center is still yellow.

Remove from oven and let cool until solid, 5 minutes or more.


Tuesday, February 12, 2013

And now, Chocolate Ricotta Cream

After the success of the lemon ricotta cream recipe I just posted, last night I decided to try a chocolate version.  It was really good!


Here's the recipe!

CHOCOLATE RICOTTA CREAM
1 serving

1/2 cup ricotta cheese (I use part-skim)
1/4 tsp. vanilla extract
1 tsp. cocoa powder (I used Ghiradelli)
1 packet sweetener (I used Domino's half sugar/half stevia blend)
1 small piece of dark chocolate for grating (garnish)

In small mixing bowl, thoroughly blend ricotta, vanilla, sweetener, and cocoa powder. Scoop into an individual serving dish and grate a little dark chocolate over top! Serve very cold!

Nutritional information:  100 calories, 4 g carbohydrates, 3 g sugars, 7 grams fat, 7 g protein


Chocolate Covered Strawberries!

Who'd ever think that something so indulgent and sweet as a chocolate covered strawberry is GOOD for you? There's no need for anyone to miss out on chocolate this Valentine's Day, and if you want to pamper yourself or someone you love, this is the way to do it!  Imagine a pretty box filled with a dozen of these lovely little sweets...it would make quite an impression!

With just 80 calories, 4 grams fat, and 10 grams carbohydrates, one large chocolate covered strawberry is the perfect little package of home-made love.  Below you will find a recipe from Smart Balance, found while I was searching their site for healthy offerings. My doctor's instructions to replace butter with Smart Balance has made for a good transition. As a purist-baker, I am someone who had nothing but unsalted butter in her fridge for years. I am very pleasantly surprised to discover Smart Balance spread and cooking oil, and even happier to come upon very interesting recipes on their Web site. Here is a photo of the strawberries I dipped last night, followed by the very easy recipe! So go ahead, have a very sweet Valentine's Day!


CHOCOLATE COVERED STRAWBERRIES
(recipe from the Smart Balance Web site)


6 oz semisweet chocolate
1 tsp Smart Balance® Cooking Oil
12 large strawberries
sprinkles, optional


Rinse and dry the strawberries.

In a medium microwave safe bowl, microwave chocolate on HIGH for 30 seconds.

Stir, add Smart Balance® Cooking Oil and repeat until all the chocolate is melted. (Do not overheat or the chocolate will become chunky and separated.)

Dip strawberries into the melted chocolate and place on waxed paper to cool.

If desired, place sprinkles on top.

Refrigerate 1 hour before serving.

Nutrition Facts
Makes 12 servings.

Nutrition Per Serving:
Calories 80
Protein 1g
Carbohydrates 10g
Fat 4g
Saturated Fat 2g
Mono Fat 0g
Poly Fat 0g
Trans Fatty Acid 0g
Cholesterol 0mg
Sodium 0mg
Dietary Fiber 1g

Recipe Source:  http://www.smartbalance.com/recipes/chocolate-covered-strawberries?utm_source=facebook&utm_medium=referral&utm_campaign=pr--recipes#main-content

Monday, February 11, 2013

Chicken Salad, Two Ways

So far, this "carb detox" isn't so bad. Maybe I've reached that threshold where cravings have subsided, OR I'm still in that initial motivational high period that I hope lasts beyond the first few weeks! What is it about dieting that has me thinking about food 24/7? Night-time reading is a stack of cookbooks, though I'm reading about healthy recipes and figuring out how to transform those not-so-light recipes into something I can actually have. I am optimistic about this effort and figure, if I have everything I need at hand, then I WILL do this! So yep, food on the brain these days. Well, at least I am thinking about healthy, hearty food that can only be good for me.  And with that in mind, last night (while watching Downton Abbey!) I poached two chicken breast halves (boneless, skinless) in lightly salted water, and put them away for today's meals, and tomorrow's. For lunch, I cut one up into large chunks and added celery and chopped walnuts for a really satisfying chicken salad, and took half of that to work with me and the rest will be lunch tomorrow. Typically, I'd add dried cranberries but they're too high in sugar for now. This chicken salad is delish!

For dinner, I sliced half of the remaining breast into thin strips which topped an abundant plate of romaine lettuce, veggies, hard boiled eggs, tomatoes, walnuts, and goat cheese crumbles.  

Here's how I poached the chicken:

Place boneless, skinless chicken breast halves in pan and just cover with water. Add a few shakes of salt and bring to a boil. Reduce heat to low, cover leaving a little crack for steam, and simmer for 15 minutes. Cut into one to see if it's cooked through (no pink).

Place cooked chicken on plate and drizzle with balsamic vinegar dressing. Cover and refrigerate over night.

CHICKEN SALAD #1:


1 cooked chicken breast half, cut in 1/2-inch chunks
1 stalk celery, cut in 1/2-inch chunks
1 tablespoon chopped walnuts
salt/pepper to taste
1-2 tablespoons mayonnaise (even less is fine, and use light if you have it)

Stir all of the above ingredients together.  Divide in half and package in to-go containers.  Makes 2 servings.


CHICKEN SALAD #2:


2 cups cut-up romaine or other lettuces
1 stalk celery, cut up
1 hard-boiled egg, sliced
1/2 of cooked chicken breast half, sliced thin (save the other half for another salad)
a few slices tomato
sliced cucumbers
6 olives
1 tablespoon chopped walnuts
1 tablespoon goat cheese crumbles
2 tablespoons balsamic vinegar dressing

Arrange all of the above ingredients in large salad bowl or dinner plate.  Drizzle with balsamic dressing.

Be prepared to be VERY satisfied with this great salad!

Coming soon:  more good-for-you snacks and desserts!

Sunday, February 10, 2013

Lemon Ricotta Cream

I've promised to bring you healthy yet delicious snacks and desserts, and this is the first of those recipes. Shannon, my nutritionist, shared a recipe with me for ricotta cream desserts, with three variations. Tonight I made lemon ricotta cream, a simple and sweet swirl of ricotta cheese (I used part-skim), freshly grated lemon rind, lemon and vanilla extracts, and a little bit of sweetener. The texture is a little bit rustic, so don't expect the creaminess of a pudding. For those of us working hard to eat well, this is a delicious and satisfying snack or dessert. It could be easily packed for lunches-to-go, as well, mixed right in the container.

Let me know what you think (and I'm trying out a fancy new photo trick!).


LEMON RICOTTA CREAM
(1 serving)

1/2 cup ricotta cheese
1/4 tsp. freshly grated lemon rind
1/4 tsp. lemon extract
1/4 tsp. vanilla extract
1 packet sweetener (I used Domino's sugar/half stevia blend, 5 calories per packet)

In small mixing bowl, thoroughly blend all ingredients.  If you want to make it fancy, pipe through a pastry bag.

Grate a little extra lemon rind over the ricotta cream for a pretty finishing touch.  Serve chilled.

Nutritional information:  100 calories, 4 g carbohydrates, 3 g sugars, 7 grams fat, 7 g protein

Variations:

Vanilla Ricotta Cream:  use 1/4 teaspoon vanilla extract

Almond Ricotta Cream:  use 1/4 teaspoon almond extract.  Sprinkle with 1 teaspoon of slivered almonds.

A Good-For-You Breakfast Omelette

Now that breads and cereals are off the option list for the short-term, I'm moving to eggs to give my morning a good start. Here's a breakfast omelette you can make in a flash.  A non-stick pan and rubber spatula make the process very simple.


This omelette uses one whole egg and one egg white.  You can serve it as is, or fill it with your choice of add-ins.  I'm using veggies from yesterday's ratatouille and a tablespoon of shredded Parmesan cheese (day 2 of this omelette for me!). I'm going to make eating healthy as delicious and interesting as possible!!!  Here are photos of how it comes together, followed by the recipe:


HEALTHY OMELETTE

Tools:  Non-stick skillet and heat-proof rubber spatula

Non-stick vegetable spray.
1 egg
1 egg white
Choice of filling (cut up cooked vegetables, low-fat cheese, Canadian Bacon, etc. - up to you)
Seasoning to taste

Spritz pan with non-stick cooking spray and turn heat to medium.

In small bowl, whisk one egg and one egg white with a fork until well blended.  No need to add any liquid.

Pour beaten egg into pan and turn to spread the egg to cover bottom.  Leave it alone until the egg is opaque and cooked through.

Spread filling in center of left side of omelette.  Sprinkle any cheese.  With rubber spatula, pick up the right side of the omelette and fold over.  Turn heat to low and allow omelette to heat through and melt the cheese.

Slide out of pan onto serving plate.

And, a bonus -- here's a photo of Henry taken yesterday as we took an afternoon walk.  He insisted on carrying that snowball the entire time!


My buddy...


Saturday, February 9, 2013

Warm Up to a Bowl of Ratatouille!

Winter storm Nemo spared our area, with just about 5 inches of snow after an anticipated foot or more. We were prepared for a bigger dumping, but are relieved because it could have been much more difficult, realizing that coastal areas of New York and New England really got hit hard.  Russ (my bf) is in Bridgeport, CT, this weekend, and that area is in a state of emergency with reports of up to 3 feet of snow!

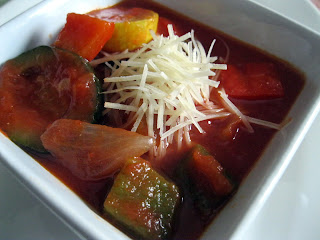
Figuring that this would be a snow-bound weekend, I prepared a big pot of ratatouille.  It's such a simple recipe, basically a stew/soup of chunky vegetables immersed in a tomato sauce.  In the middle of winter, it's like a warm serving of summer with a sprinkling of parmesan.  We're so fortunate to find fresh vegetables like zucchini and peppers in February!  And even better, it's so completely healthy!  With just a couple of tablespoons of olive oil, the vegetables join together to eventually simmer into a beautiful medley of fresh flavor. I can't wait to wrap my hands around a warm bowl!  (I even added some of the vegetables from the pot to an egg-white omelet this morning, making for a mighty fine breakfast!)


My car under the snow!


Here's my version of the recipe, with a couple of photos to bring summer's color to this snowy-white day!


RATATOUILLE

2 tablespoons olive oil
2 sweet onions, cut in wedges
2 small zucchini, cut in 1/2 inch slices
2 small yellow squash, cut in 1/2 inch slices
1 each -- green, red, yellow peppers, cut in 1/2 inch chunks
8 ounces mushrooms (I used baby bella)
2 cans crushed tomatoes
1 4 ounce can tomato paste, with seasoning (Italian herbs, etc.)
3 cups water or vegetable stock
Parmesan cheese

Add olive oil to large, heavy pot or dutch oven.  Add cut-up vegetables and cook over medium heat, stirring occasionally, until vegetables wilt and zucchini and squash are translucent.  Add crushed tomatoes, tomato paste, and mushrooms.  Add water or stock.  Bring to a boil and then reduce heat. Simmer slowly, stirring now and then, for a few hours.


Serve with a sprinkling of Parmesan cheese.


Friday, February 8, 2013

Waiting for Nemo and Planning A Cozy Weekend

Schools were closed in this area of upstate New York today, in anticipation of a winter storm named Nemo.  It's almost 6:40 pm, and Nemo has, so far,  only whispered that he's planning to show up. From weather reports on television, he may not hit with full force until very late tonight, and 8-14 inches of snow are predicted for Middle Grove.  I'm grateful I was able to get to and from work without having to deal with him while I was on the road.

When I arrived home, I visited Katie, Bill, and the boys in their part of the house.  They were sitting down to a dinner of Shepherd's Pie (beautiful!), and I was so happy to hear Katie say she made a dinner for me, too (such a sweet daughter I have!).  She had steamed french-style green beans as well as a generous serving of shrimp. This was especially kind since it seems my days of indulging in such great meals as Shepherd's Pie are over, as I have been recently diagnosed with adult-onset diabetes, type 2.  Fortunately, it has been discovered early enough that I can avoid medications and injections, as long as I do what I'm instructed. There have been many medical appointments, and I feel very "high maintenance" right now, something not my usual style. But, I have decided to let the experts direct this course of my life, to use their experience to show me how to live from this moment on.  Much will change, beginning with the foods I buy at the market, the meals I prepare for myself, and even my relationships around baking.  It was necessary to end a long and cherished business relationship with a family I baked for, for years. I am sad about that, but to bake that much, that often is not in the best interest of my health.  I will continue to bake cakes for friends and family, but will not be baking the same standard goodies as often (but will now and then, and donate to friends at work!). Instead, I will be concentrating on made-over and delicious offerings of favorite foods that will become new standards in my recipe box.

For now, I'm limited to mostly vegetables and protein, just for the first few weeks. Very low carb living for the immediate future. It's been going well so far, though it's just been a few days. I will very slowly, very gradually bring whole grains and fruits back in to the fold, but not yet.  It will be so nice to crave an orange instead of a cookie! My nutritionist said that it only takes three days to break the carb addiction, and believe me, I am SO addicted to carbs that I could use a 28-day residential detox program! I was joking with my good friend Liz that I would love to be "committed" to a month-long stint at Canyon Ranch in Arizona, where all healthy meals and planned activities would be scheduled and followed in grateful bliss!  Who wouldn't want a month of such self-indulgence?

Well, this isn't Arizona and the therapeutic warmth of real sunshine seems months away, so I will comfort myself this weekend with fuzzy socks, a warm robe, and maybe even pajamas all day! Tomorrow morning I'm putting a big pot of ratatouille on to cook long and slow, and will so appreciate the warmth and goodness of such a satisfying dish. I'll take photos and post the recipe as I go along. I have always loved ratatouille.  This time I'm making it with zucchini, yellow squash, onions, and peppers -- green, red, and yellow.  To that, I'll add tomatoes and baby bella mushrooms, and let it simmer all day. Each serving will come to life with some freshly grated Parmesan cheese.

Wherever you are this weekend, get cozy, relax, and enjoy some time for yourself.  And please do follow along on this new healthy journey of mine. I'm so inspired, and I hope that the foods and recipes I post along the way will be inspiring to others, as well.

Take care!

Sunday, February 3, 2013

If This Is Oatmeal, Give Me More!

When my doctor told me to eat oatmeal for breakfast as often as possible, I turned up my nose.  I don't like oatmeal. Never liked the texture. I like my cereal to be crunchy, a little bit sweet, and swimming in icy cold milk.  I was never one of those kids who warmed up to a bowl-full of steaming oatmeal, Maypo, cream of wheat, etc. Yuck. Never.  My kids, on the other hand, always loved it, so I didn't let my prejudices influence their breakfast options!  Still, I'd never eat it.  But, now that my doctor "ordered" oatmeal-for-breakfast now and forever, along with other dietary and life-style changes (yes, the baking/testing and overall love of good food has made its physiological impact known, not a shocker), I am motivated if not inspired to be a good girl and do exactly as the doctor orders.

So, the baker in me has reconciled that, if I must eat oatmeal, I'm going to eat it on my terms, make it interesting, and if possible, delicious.  I always keep a canister of old-fashioned rolled outs in my pantry (for cookies, of course).  But for breakfast, the choice is steel-cut oats which carry even more nutritious impact than the rolled variety.  Oatmeal as breakfast is going to be as un-processed as possible - no paper packets of flavored and sweetened quick oats can provide the health boost I'm looking for.  While the packets are convenient, making a pot of real oatmeal is not a big chore.  It's relatively quick, especially if you buy the steel-cut oats that come up to a boil and simmer for just 5-7 minutes.  The water-to-oats ratio is 3:1.  For a single serving, you'd use 1/4 cup oats to 3/4 cup water.  Since it will be breakfast for me most mornings, I made a larger batch with 6 cups of water to 2 cups of oats.  Now I have a VERY quick breakfast every morning -- just have to scoop out a cup and microwave for about a minute, and my morning will be off to a warm and hearty (and yes, delicious!) start!

This oatmeal recipe is so good, I'd even eat a little bit of this for dessert!  To the just-cooked oatmeal, I stirred in chopped walnuts, dried cranberries, brown sugar, and little bit of pumpkin pie spice. For six-plus cups of oatmeal, there's just three tablespoons of brown sugar, and I believe the fiber and protein of the oatmeal off-set this little bit of natural sugar.

Here's my recipe for a big pot of oatmeal and photos of how it comes together (very easy!):

STEEL-CUT OATMEAL
(serves 6-8)

2 cups quick-cooking steel-cut oats
6 cups water
1/2 cup walnuts, chopped
1/2 cup dried cranberries or raisins
3 tablespoons brown sugar
1 teaspoon spice (I used pumpkin pie spice - you can use cinnamon)

In large pot bring oats and water to a boil.  Reduce heat and simmer for 7 minutes.  Remove from heat and let sit for about 5 minutes. Stir in walnuts, cranberries, and brown sugar.

Serve warm, and if you are inclined, add a little spritz of whipped cream!


rolled oats (left) and steel-cut oats (right)


Taa Daa!

Friday, February 1, 2013

A Couple of Cakes to Welcome February!

First of all, congratulations to my niece Sarah Eddy Strouse who won January's comment contest.  Sarah gets to choose her prize -- cake, cookies, scones, cinnamon rolls, or something very chocolate (her preference) or lemon (her husband Bob's favorite). And even though Sarah is my niece, she won fair-and-square.  Her name was dropped into the hat along with everyone else who commented in January (one entry per comment), and my friend Lynn D pulled it out, even though she had a couple of entries in there herself. A generous act, I must say! (Thanks Lynn!). I'm happy that Sarah won, and look forward to continuing this contest beyond April, beyond the year that I had originally envisioned.  I don't see this monthly celebration of my commenters going away any time soon, so be sure to add your own comment or three when you have a chance.  Odds are GREAT that it will pay off!

Anyway, this is a two-cake weekend, both delivered this morning. The first is a birthday cake for my friend Mimi's son Paul.  The second is for my friend and co-worker Helen, whose husband is a huge Mets fan.  I am fairly certain neither men read my blog, so it's probably safe to show photos of these cakes which will be part of their family celebrations tomorrow.  There are cupcakes as well for Mimi's family, to be delivered to her front door in the morning.

Paul's birthday cake is a light yellow vanilla cake with a very buttery buttercream frosting (recipe follows).  It was decorated in a pretty simple design of vines, leaves, and little pressed flowers. Mimi, Paul's mom, always asks me to bake cakes for her family celebrations.

Helen's cake, the same vanilla, has a white buttercream frosting, and decorated for her husband's favorite baseball team, the Mets.  I hope he'll love it.

That's all the baking I had scheduled for this weekend.  It's been such an intense time at work, in the middle of our busiest season, and January is now behind us.  I'm grateful for a low-key weekend to decompress, to say so-long to frigid January and welcome the much-closer-to-spring February! With nothing on the schedule other than meeting my good friend Liz at Starbuck's very early in the morning (too early for most of my other friends!), the weekend is off to a good start.  I'm looking forward to spending some time catching up not only with Liz, but also my own little life here in Middle Grove, New York.  Have a GREAT weekend everyone!

This weekend's cakes...

Mimi's Cupcakes


Very Buttery Buttercream Frosting

1 cup soft butter (room temperature - I use unsalted)
1 tablespoon vanilla extract
5 cups confectioners sugar
up to 1/2 cup milk (more or less for desired consistency)

In large mixer bowl, beat 1 cup soft butter until light and fluffy. Beat in vanilla extract  Dump confectioners sugar all at once into the bowl, and at very low speed, very slowly add milk, a bit at a time, scraping bowl as you go along to make sure it all gets incorporated. Increase speed, and add more milk if necessary.  Stop adding milk when you get to the right spreading consistency.