Tuesday, April 30, 2013

Happy Birthday Henry

There's very little time to blog today, but I can't let this day close without mentioning that this is Henry's 5th birthday. Five years ago this evening, my daughter Katie and her husband Bill changed my life. The most beautiful and precious bundle, my first grandchild, was placed in my arms. Love as I knew it evolved into something new, something deeper, something so profound. Something that will last until my last breath and beyond. Being a grandparent is an amazing transition in one's life. Unlike parenting, this graduated status allows us to love completely but without the weighty responsibility that every decision, every choice might have life-long repercussions! It's a joyful connection, one I knew existed but couldn't possibly understand until it happened. My joy was doubled the day little Pete joined us, two and a half years later. Love can exponentially expand with each new grand baby, as I have realized.

Happy Birthday, Henry. And as I borrow this beautiful sentiment from my friend Liz, who shares it with her two little grandsons, and as Henry and I now say to each other, "Henry, how much do I love you?" "You love me to the moon, and back." Yes, Henry, and Pete.  I sure do.  And then some.


Love at first sight...


Henry at 14 months
(Photo by Irene Goyette, Bennington VT)

On his way to growing up...

Monday, April 22, 2013

Lemon Meringue Cupcakes!

Here's a fancy-schmancy cupcake that couldn't be simpler. I was inspired by the idea of creating a unique cupcake, one that I hadn't seen before. The idea of a poundcake cupcake  -- enhanced with grated lemon rind and filled with actual lemon pie filling, and ultimately crowned in toasted meringue, became a temporary obsession, and I wouldn't rest until it was done.

Here's how I did it - so simple: Bake a dozen or more cupcakes from a good pound cake recipe - from scratch or a mix that you love. The cupcakes take about 25 minutes to bake at 350 degrees. When the cupcakes have cooled, carve out a cone-shaped cavity to hold about a tablespoon of just-made lemon pie filling. I used a grapefruit knife to cut out the centers. I topped each filled cupcake with a crown of meringue, and baked them at 400 degrees F for about 6 minutes, just until the meringue began to brown.

That is IT! My taste-tester Henry gave his cupcake two thumbs up!


LEMON MERINGUE CUPCAKES
Oven 350 degrees F

1 recipe pound cake, from scratch or mix
1 teaspoon freshly grated lemon rind
1/2 teaspoon lemon extract

lemon pie filling (I used Durkee Lemon Pie Filling Mix, followed package directions)

Meringue (recipe follows)

Preheat oven to 350 degrees F

Mix pound cake batter, adding grated lemon rind and extract. Line muffin tin with paper liners and fill 2/3 full with batter (I use an ice cream scoop to evenly fill cups).

Bake for 25 minutes or until cupcakes test done (toothpick or "press" test - the surface bounces back when lightly pressed in the middle). Cool in muffin tin. Leave cupcakes in tin.

Carve out a cone-shaped cavity from the center of each cupcake (about 1 1/2 inches in diameter, and an inch deep).  Keep cupcakes in tin. Add lemon filling to the cavity. Top with meringue and place muffin tin in another muffin tin or on a cookie sheet (to help insulate cake). Bake at 400 degrees for 6 minutes or until the meringue is nice and toasted.

Meringue:

2 egg whites, room temperature
1/4 tsp. cream of tartar
1/4 cup sugar

In spotlessly clean mixing bowl, with whisk attachment or beater, beat whites and cream of tartar until soft peaks form. Gradually add sugar and continue beating until stiff peaks form. Spread or pipe meringue on top of cupcakes, covering the entire top of cupcake if you can.


These cupcakes (other than Henry's test cupcake) traveled to my neice Sarah's home. She was having a birthday party for her two April birthday girls, Hannah and Katie, and a small family party (which Henry and I kind of crashed!) so I knew they'd be enjoyed.  Sarah's husband Bob LOVES lemon everything, so I decided to get these out of my kitchen and into theirs!

The next time you want to bake to impress, try this easy recipe for lemon meringue cupcakes! No one will be sorry!


Tuesday, April 16, 2013

I Made My Own Yogurt!

Many people who know me know that I have been on a quest for the perfect yogurt. I've tried many brands, been loyal to some for a long time, others for a short time, and still haven't settled on "my" favorite brand. I do love Fage, but it's pretty expensive. I love Cabot as well, also expensive, and a tangier yogurt than others. For years I loved Yoplait Custard Style, until I realized it has almost as many calories as a small hot fudge sundae! I'm trying to stay away from chemical sweeteners, so most of the "light" yogurts won't do, since they are sweetened artificially. I was thinking of buying a commercial yogurt maker, but how would I even know if I liked the end result? So, I headed to the trusty internet in a search for home-made yogurt recipes with reviews, so I could read first-hand how people rate the yogurt recipes they've tried.The first thing I realized: it's not rocket science. It doesn't need to be complicated. It doesn't require a lot of kitchen contraptions. So, over the past few days, I have mixed together my first batches of home-made yogurt. It takes more time than effort, and here's the verdict: It's delicious. It's light, and mild, and sweet without any sweeteners. I'd never eat plain yogurt, and I loved this, and made a second batch and stirred in some local honey and a bit of vanilla. With berries, or granola, it will be a wonderful breakfast or dessert. A swirl of jam, or lemon curd, or marmalade could put this lovely yogurt over the top. So, now I am a yogurt maker. I may never buy yogurt again!

HOME MADE YOGURT

1/2 gallon milk (skim to whole fat, your choice) I used Battenkill low fat
4 tablespoons plain yogurt to use as a starter (I used Cabot Plain Greek - you can use any plain yogurt)

  • In dutch oven or large pot on stove, over moderate heat, bring milk to 185 degrees F (bubbles start forming around edge), or to just before boiling, stirring to make sure milk doesn't scorch on the bottom of the pot. 
  • Remove pot from heat and cool down to 110 degrees (a candy thermometer would be very helpful for this process.) If you don't have a thermometer, 110 degrees is when it's still hot but not painfully hot when you dip your pinky finger in (a standard gauge for measuring heat in a lot of yogurt recipes!).
  • Take 1 cup of the heated milk and mix with the 4 tbsp. of starter yogurt (whisk together) and stir back into the hot milk mixture. 
  • Wrap a thick towel completely around the pot (with lid) to incubate the yogurt and keep it warm.  Place wrapped pot in oven (turned off!) with the light on, and let sit for 8-14 hours. I let mine sit overnight and then all day while I was at work.  
  • Unwrap pot and place yogurt in fridge to chill completely before straining (I poured the yogurt into a large bowl for the fridge).
  • To strain, pour yogurt into a lined colander set over a large bowl. I used a few sturdy paper towels as the liner. (To create space for the whey to drain, I inverted a small pyrex dish in the bottom of the bowl and set the colander on top of that.) Allow yogurt to drain until it reaches the consistency you prefer. Pour off whey as it accumulates. I let it go overnight to make it thicker. To make it an even thicker Greek style yogurt, strain again.To make yogurt cheese, strain even longer. I had saved yogurt containers (washed in the dishwasher) so I had a quart container ready. My half-gallon of milk made just under a quart of yogurt, pretty much for the price of a half-gallon of milk. Well worth the effort!


I made home-made yogurt!  You can, too!

Thursday, April 11, 2013

Chicken Soup with Broken Lasagna Noodles

What do you do with a rotisserie chicken from the market after you were so hungry that you ripped off that chicken leg for a quick snack when you got home from shopping and never actually had it for dinner?  I had plans to make chicken salad from the breast meat, and definite intention for the rest of the chicken, thinking I'd eventually heat up some veggies and have it for dinner, or add some nice white meat to a big dinner salad (neither of which ever happened). So today, when I didn't have to be at work until 2 p.m., I decided to take advantage of a morning at home and make a pot of home-made chicken soup. I know the basics about making a broth-based soup, and just started chopping vegetables and kept building the soup up until everything was simmering away in the pot. I had help from social media making this soup, too, incorporating two cultural traditions! I was on facebook and posted a photo of the veggies in the pot. Joanne suggested (as a trusted Jewish cook) the garlic and tomato, and Diane said her Italian mother always finished with a squeeze of lemon! So this Irish girl had wonderful advice that resulted in a very delicious broth. How cool is that, to have a recipe evolve by contributions as it's being made! And I added my own unique touch, too. When it came time to add pasta, I realized I was out of ditalini, my favorite for soup. So, I got creative (I work at a college where the catch phrase is "Creative Thought Matters") and took six uncooked lasagna noodles and broke them up in roughly 1-inch pieces. It was pretty simple, and very delicious! It made a great packable meal for my late night at work, and the rest of the pot went downstairs to Katie's house so they could enjoy it.

Here's my brand new recipe! (followed by a few photos of the soup coming together):

CHICKEN SOUP WITH BROKEN LASAGNA NOODLES

1 cooked rotisserie chicken from the market
2 tablespoons olive oil
2 onions, chopped
4 ribs celery, chopped (save leafy tops for finished soup)
12 baby carrots, sliced in roughly 1/8-inch slices
1 large tomato, or a good handful of grape tomatoes, sliced in half
1 tablespoon minced garlic (I buy it already minced in a jar, in the produce section)
water
1 tsp. salt
1/2 tsp. black pepper
1 lemon, grating about a teaspoon of the peel and also squeezing half the lemon for juice
6 uncooked lasagna noodles, broken into 1-inch rough pieces
Good Parmesan cheese (I like shredded)

Directions:

Cut meat off chicken and dice into small chunks, removing skin. Set aside. Put the remaining trimmed chicken and skin in a medium saucepan and cover with water.  Add a few more stalks of celery (cut to fit in pot) and tomato or tomatoes and bring to a boil, reduce heat, and simmer while you cook the rest of the vegetables in the larger pot.

Into the larger pot, pour 2 tablespoons of olive oil.  Add onions, celery, and carrots and cook over medium heat until they begin to "sweat" and take on a translucent look, 10-15 minutes. Add garlic, salt, and pepper and continue to cook for another five minutes or so over low heat. Add water to fill pot half-way or about 4"inches deep.  Bring to a boil, reduce heat, and simmer for a while, about half an hour is fine. Meanwhile, strain the liquids from the smaller pot into the larger pot. Get the tomatoes from the strainer and add to larger pot. Cut off any additional meat from the strained chicken and add to larger pot. Add the rest of the chicken meat you cut up and set aside earlier. Add broken lasagna noodles and the chopped up leafy greens from the celery stalks. Add grated lemon peel and squeeze half a lemon (catch the seeds) into the pot. Let simmer for at least another 10 minutes or until noodles are softened.

Ladle into serving bowls. Top with some shredded Parmesan cheese.


Thanks for reading, and if you have your own special chicken soup recipe, and a family story to go with it, I'd LOVE to hear about it!

All the best,

Jeannie
aka The Adirondack Baker

Sunday, April 7, 2013

Lemon Scones, Revisited

As a lovely weekend draws to a close, I'm taking a few minutes to share a slightly-revised recipe for lemon-filled scones. This batch was the prize for Sarah, the winner of a recent monthly comment contest on this blog (details to the right!). The basics are all the same as the scones I've previously posted (a great foundational recipe for every scone I make) but I did make a few adjustments. To make these scones even more lemony, I grated lemon peel for both the dough and also the glaze. To make them a little less decadent, I reduced the butter by one third (not even noticeable). To sour the milk to make my own buttermilk, I switched acids from vinegar to fresh lemon juice, to be consistent with the flavor theme.

The tried and true steps of my scone making remain consistent and simple. Butter is cut into a mixture of flour, sugar, baking powder and salt, but this time I added about a tablespoon of freshly grated lemon peel.To that is added the soured milk mixed with beaten eggs as well as some vanilla and lemon extract. It's tossed together lightly with a fork to create what I think of as a "shaggy mess" and then the dough spends a few minutes in the freezer to make sure the butter pieces stay whole and cold when the dough is shaped into scones.

This is a wonderful and very adaptable recipe, and can be customized for whatever flavors and additions inspire you. If you want to make a savory dinner scone, just leave out the sugar and add cheese, or crumbled bacon, or fresh herbs -- whatever you think of that will make it your own.

Here's the recipe, followed by step-by-step photos illustrating the process. It may seem long and complicated, but it is neither. Once you try this scone recipe, you'll make it again and again!  I was able to make it with these little wise-guys hanging around...

My grandsons Henry and Peter, happy little dudes!


LEMON-FILLED SCONES
Preheated 375-degree F oven

2 cups all-purpose flour
1/4 cup granulated sugar
1 tablespoon baking powder
1 teaspoon salt
8 tablespoons unsalted butter, room temperature
1 tablespoon freshly grated lemon peel
1/2 cup buttermilk or a tablespoon of fresh lemon juice with enough milk added to equal 1/2 cup
2 eggs, beaten
1 teaspoon vanilla extract
1/2 teaspoon lemon extract

Lemon curd - about 2 generous tablespoons (I like Dickinson's)

Additional beaten egg for egg wash

Glaze:
1 1/2 cups confectioners sugar
1/2 teaspoon lemon extract
1 teaspoon grated lemon rind
enough water to make a thick but drizzle-able glaze (it might be a word!), a few drops at a time

Directions in pictures:

Grate some lemon peel, a generous tablespoon plus a little more...

Mix together flour, sugar, baking powder, and salt.  Add butter and lemon rind.

Found this at an annual antique sale in Warren County!
It's one of my favorite things (for another blog post!)

Cut butter into flour mixture until butter particles are pea-sized.

Like this...

Mix buttermilk or soured milk with two beaten eggs and extracts.

Mix buttermilk mixture into flour mixture, tossing lightly with a fork until it's a "shaggy mess" like this...
Put in freezer for 10 minutes.  Take out and form into a loaf on a lightly floured surface.

Flatten the loaf and knead, gently folding it over itself and pressing into new "loaf" about 8-10 times.
Add more flour as necessary to keep from sticking to your surface.
Divide into 2 portions and flatten each into an 8-inch disk.

Like this...

Drop a generous tablespoon of lemon curd on top of each disk.

Spread to within 1/2-inch of the edges.

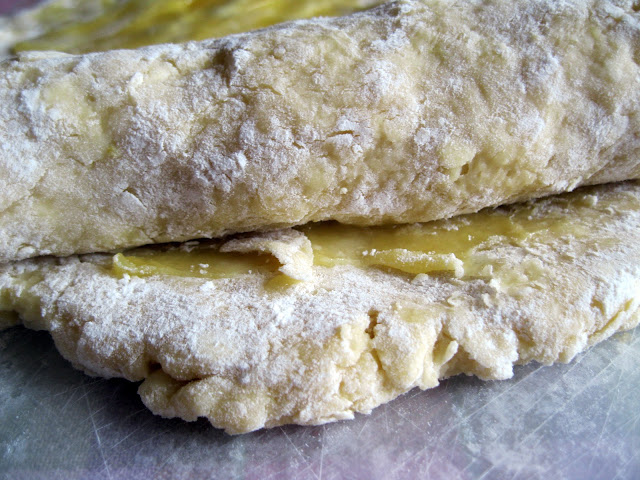
Roll up jelly roll style, and...

Tuck ends under and flatten into new disks.

Cut disks into 6 wedges each.

Place triangles on parchment-paper lined cookie sheet and brush with egg wash
(if you don't have a pastry brush, mop the egg wash on with a wadded up paper towel). 

Bake at 375 degrees Farenheit for 20 minutes or until the scones look like this,
with a gentle browning to the tops.

Mix glaze ingredients adding enough water, just a few drops at a time, until it flows off the fork like this...
Drizzle over hot scones.  Glaze will dry as scones cool.

Your scones are done!
 Well, that's it! Try this recipe, and follow the photos to get it just right!

Thank you for reading. I look forward to your comments (perhaps prize-winning comments!).

Have a great week!

Wednesday, April 3, 2013

Banana Chocolate Marble Bread

The first thing I am doing today is wishing my daughter Tricia a very happy birthday! She was born 31 years ago, three weeks late, and entered the world by cesarean section at 9 lbs., 3 oz., with a head of very blonde hair and the rosiest cheeks. It seems like yesterday, in some ways, and it's very hard to believe that my youngest child is in her 30s! As in 1982, spring was late to arrive that year and just after she was born, this area was hit with an early spring snowstorm that dumped a huge amount of snow, keeping visitors home. Tricia and I had a lot of time to get to know each other during those quiet days in the hospital! With a house-full of little ones at home, I was grateful for the "vacation!"

Tricia's birthday cake was baked last night and will be frosted when I get home from work today. It's a deep, dark chocolate cake and will be frosted with chocolate as well. There seems to be a genetic predisposition toward chocolate that Tricia carries in her DNA - from both sides! I am  happy to indulge this deep-seeded craving for Tricia and the rest of the family who will celebrate her day,  though nothing has been scheduled yet. We're all too busy with work schedules and hopefully, we'll find a time to come together to wish her a wonderful year ahead!

While Tricia's cake was baking, I had another project in the works. I'd been thinking all day of ways to use the abundance of bananas that Katie had left over from the weekend She had bunches and bunches of the fruit, beginning to become perfectly ripe for baking. With chocolate on my mind, I decided to bake up a loaf of banana chocolate marble bread, inspired by a recipe from Cooking Light. I took it up a healthier notch by adding fiber and protein with flax meal. The original recipe called for yogurt, but I didn't have plain yogurt in my fridge so substituted low fat sour cream and it worked beautifully.  Here's the recipe and a photo, where you can see that my changes were very successful!


Soooo good!


BANANA CHOCOLATE MARBLE BREAD
oven - 350 degrees Farenheit.  
One standard or approximate loaf pan, sprayed or greased

3 very ripe bananas
1 cup granulated sugar
1/4 cup butter, margarine (I used Smart Balance) or canola oil
1/3 cup plain yogurt or sour cream (I used light sour cream)
1 large egg
2 tsp. vanilla extract

2 cups all-purpose flour (or 1 3/4 cups whole white or whole wheat)
1/4 cups flax meal (if you have it, I added this to the original recipe)
1 tsp. baking soda
1 tsp. baking powder
1/2 tsp. salt

1/3 cup semi-sweet chocolate chips, melted in microwave (about 1 minute, stirred)

In large mixer bowl, beat ripe bananas until completely mashed. Add sugar, butter, yogurt, and beat well. Add egg and vanilla.  Beat again.

To this mixture, add mixture of flour, flax meal, baking soda, baking powder, and salt.  Mix fairly well until all dry particles are incorporated.

To one cup of batter, stir in melted chocolate. Spoon banana and chocolate batters alternately into prepared pan. Swirl with knife. Bake for 1 hour to 1 hour, fifteen minutes or until loaf tests done (bounces back when pressed in the middle or toothpick inserted in center comes out clean). Mine was done in an hour and five minutes.

Cool in pan for 1/2 hour  Remove from pan and cool on wire rack. While still a little warm, wrap in foil or plastic wrap.  This is a tip my sister-in-law Lynn shared years ago - it keeps the loaf very moist!

Enjoy sliced right from the loaf, or enjoy a toasted slice with peanut butter!

AND, here's a photo of Tricia's birthday cake - which ended up with mocha frosting.  Dark chocolate cake with mocha frosting - yum!


Happy Birthday, Tricia!!!


Thanks for visiting, and have a great day!