Thursday, December 16, 2021

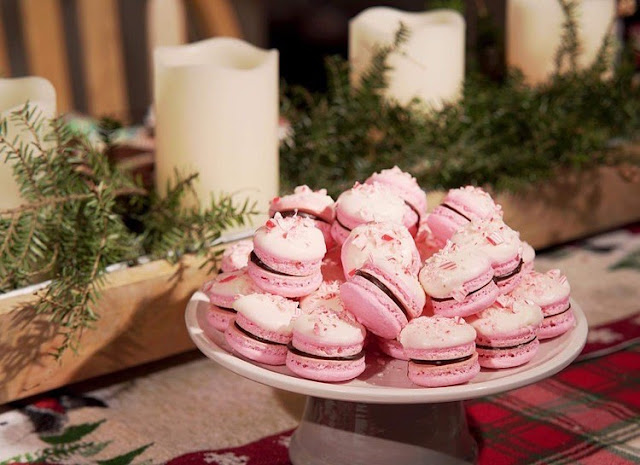
Peppermint Bark Macarons!

Peppermint Bark Macarons!

Photo by Ross Kowalewski, @rkiiifoodphotography


Macarons and I have a spotty history. I've tried so many techniques, relied on sworn "best" or "fool-proof" recipes, and short of praying to the macaron gods, have had varied results. I've been both overly confident and totally defeated. I've had different results from the very same batch of macaron batter! The first sheet comes out beautifully, the next lopsided and cracked. In my failures and successes, I've learned a few things but mainly, simpler is better. So, I have a few standard practices that have given consistently great results (see photo above!) and I'll share those tips with you.

My tips - Read first!:
1. Aged egg whites at room temperature - I let them sit overnight on the kitchen counter in a small bowl covered in plastic wrap with holes punched in the wrap. I've also put them in the fridge for a couple of days until I could get around to making the macarons. This dehydrates the whites a bit so they are sturdier when whipped. 

2. Addition of egg white powder - about 1 tbs per 3 egg whites which helps to stabilize.

3. Don't beat the egg whites to death

4. Wipe all surfaces (bowl, beaters, silicone baking mats) with white vinegar. NOTE: I have used parchment paper where the macarons stuck/broke, and the silicone baking mats work beautifully! Don't buy the ones with the recessed wells, though. I've read they can be a nightmare! I bought the silicone mats made for macarons with the printed circles. 

5. Oven - preheated to 290 F, middle rack and just ONE cookie sheet at a time.

6. Baking time: 14 minutes for smaller Macs, 16 for larger in my oven. 

And here's the shocker: rather than fussing with a food scale and measuring ingredients to the precise gram, I have had consistent success using measuring cups for granulated sugar, confectioners sugar, and almond flour. 

Equipment needed:
Two mixing bowls
Hand-held mixer
Spatula
Strainer
Measuring cups
heavy cookie sheets
silicone mats with the printed circles
White vinegar/paper towel
Plastic/disposable pastry bag (16-inch - small won't do) note: I wash and re-use these
#12 Wilton tip with a large circle opening
zip top bag 

Recipe: 

Macaron ingredients:
1 3/4 c. confectioners sugar
1 c. almond flour
3 egg whites, room temperature, aged 
1/4 c. granulated sugar
1 tablespoon egg white powder 
gel food coloring - 2 drops
White chocolate morsels or candy melts, about 4 oz.
candy canes, crushed (about 2)

Chocolate buttercream ingredients:
12 tablespoons unsalted butter at room temperature
1 1/2 cups confectioners sugar
1/4 c. cocoa powder
pinch salt
1 tsp. vanilla extract
A couple tablespoons milk 

Steps to making the macarons:

1. Preparing: Invert a half-sheet pan or other heavy-duty cookie sheet (thin pans don't work, they get too hot) and place silicone baking mat on top. Wipe down baking mat with white vinegar. You'll need at least two pans prepared this way. The macarons cook more evenly on an inverted cookie sheet. The oven air flows more consistently, I've found. 

Into a mixing bowl, sift/strain 1 3/4 c. confectioners sugar with 1 c. almond flour. Any almond flour bits that don't go through the strainer can be discarded. Whisk to blend thoroughly. Set aside.

2. Mixing: 
In another mixing bowl that's been wiped down with vinegar: with a hand-held mixer, beat egg whites until foamy, then slowly add in 1/4 c. granulated sugar.  Add in 1 generous tablespoon egg white powder (this stabilizes the liquid egg whites). Beat to just-stiff peaks. You'll know it's stiff peaks when the meringue doesn't flop off the beater and creates a 'beak' or when you can turn the bowl over and the meringue stays firmly in place. You can add food coloring at this point. Use a gel color and just a drop or two. Beat another few seconds until color is infused throughout.

3. Macronage:
Now, take about a third of the almond flour/confectioners sugar mixture and fold it in to the meringue, using your spatula to flatten out the batter. Fold in, around, down until it's all mixed in, and do that two more times with the rest of the almond flour mixture. This process is called 'macronage.' Continue to scrape, fold, turn, and press until the batter begins to flow off the spatula and you can form a loose figure 8 with the batter. The STOP. 

4. Piping:
Fit a large pastry bag with a round tip (Wilton #12) or similar sized other brand. I trim off the pointed bottom of the pastry bag just enough so the tip can drop in and fit snugly. Twist tip to close off and then place pastry bag in a large cup or glass and open up. Using your spatula, load macaron batter into the bag, leaving a good 6 inches or so empty so you can twist it shut. I use a twist-tie around the bag at the top of the batter so it won't ooze out. 

Holding the pastry bag at a straight up-and-down 90-degree angle, pipe batter from bag to form circles using the guides on the mat or just making consistent 1 1/2-inch macarons or as big/small as you like. Give bag a quick flick to stop the flow and move on to the next one. 

5. Resting/drying:
When sheet is filled, carefully but energetically tap the bottom of the pan which helps to release any air bubbles. Pop large bubbles with a toothpick. Now, let the pan rest for about 1/2 hour to 40 minutes OR until you can touch the side of a macaron and it's somewhat dried and doesn't stick to your finger. 

About 20 minutes into drying, I pipe out the next sheet so it can rest for 40 minutes as well. 

6. Baking:
After 40 minutes resting, carefully place macarons in oven and set timer for 14 minutes. If you can wiggle the top of the macaron at 14 minutes, give it another two minutes in the oven. If it's ready, it won't wiggle.

7. Filling:
Cool completely. Match up tops and bottoms by size and fill half the macarons (bottoms) with chocolate buttercream* recipe follows), using about a teaspoon of filling. Gently press bottoms of two macarons together so filling reaches the edge. I find piping the filling to be easier than using a spoon. 

8. Make 'em fancy!:
Melt white chocolate or candy melts in a small bowl in the microwave, according to package directions. 

Crush a couple of candy canes in a plastic bag to create peppermint sprinkles. I use a zip-top bag and a meat tenderizer, smooth side. 

After you dip the top of an assembled macaron in the melted white chocolate, generously sprinkle crushed peppermint on top. Let cool. 

9. Maturing (also known as waiting):
Macarons 'mature' in about a day. Before that, they just haven't reached their full, delicious potential. With the filling in place, the macarons absorb some of their moisture and the flavors develop. So, give them the time they deserve. Of course, if you want to 'test' one, I won't tell anybody!

*Chocolate buttercream:
Beat butter until light and fluffy. Add confectioners sugar and cocoa powder and VERY SLOWLY mix together on lowest speed (careful, it can fly out of the bowl). Add vanilla and 1 tbsp. milk, and then add more milk a bit at a time until the buttercream reaches a med/stiff frosting consistency. Less is more with milk, add just a drop at a time because if you add too much, there's no going back. 

10. Report back! 
Let me know if you try this recipe. It's not as complicated as it sounds, but then again, macarons ARE complicated and I wish you (and me!) luck every time!


Monday, November 29, 2021

My Favorite Sugar Cookie Recipe

This recipe comes just in time for your holiday baking!

Oh Christmas Tree!

In the past I have written about this favorite sugar cookie recipe, one I adapted from the Food Network's own Alton Brown. Since he is a food scientist, Mr. Brown understands a recipe on an almost molecular level. I first made these cookies about 10 years ago, if not before. The recipe stands out for many reasons. It comes together quickly with just a few ingredients. It rolls beautifully, I've found, even without chilling. In fact, though the recipe calls for chilling the dough for an hour, I let it rest at room temperature and roll it out without refrigerating. Cookie cutters work like a dream, and re-rolled scraps are as tender as first-cut cookies. This recipe takes to a sprinkling of sugar or a full-on flood of royal icing. It can be as simple or as elaborate as your energy levels dictate. I use it for almost every holiday, and I even roll it into balls and make jam thumbprints. It's a cross between a sugar cookie and shortbread, with a prominent butter and vanilla flavor. It's almost as easy as buying prepared sugar cookie dough, but so much better. If I can't convince you to try this recipe, let me just say that you are missing out!

Cut-out Sugar Cookie Recipe, adapted from the Food Network and Alton Brown

Preheat oven to 375 degrees F
Line cookie sheets with parchment paper (Always!!!)

Stir together:
3 cups all-purpose flour
3/4 teaspoon baking powder
1/4 teaspoon salt
Set aside.

In mixing bowl, cream:
1 cup unsalted butter, room temperature
1 cup granulated sugar

Add:
1 egg, beaten
1 tablespoon milk
1 teaspoon vanilla extract (my addition)

Optional: add 2 tbsp. freshly grated orange or lemon zest and you won't regret it!

The original recipe calls for chilling this dough for an hour. If you don't want to do that, let it rest for a while (maybe 20 minutes) and roll out at room temperature. Also, if you don't want to roll out all the cookies in one fell swoop, you can freeze half of it to roll out another time. I freeze cookie doughs all the time. 

On a lightly floured surface with a lightly floured rolling pin, roll out about 1/4 inch thick and cut with cookie cutters. Re-roll scraps. 

(IF you are not planning to frost these cookies after baking, before they go in the oven you can sprinkle with decorating sugars.)

Bake for about 9 minutes but check for a very slight browning on the bottom edge of the cookies. That's the true sign that they are ready to come out of the oven. Without that indication, they are likely underdone. 

Cool on pans for about 10 minutes and then cool completely on wire rack. When completely cooled, you can frost. 

Royal Frosting: I use this recipe from Sally's Baking Addiction blog. It's a wonderful recipe and is linked here. 

I do hope you try this recipe this holiday season. I have a feeling it will be your go-to sugar cookie recipe if you do!


Wednesday, November 17, 2021

I Reject Dieting!


I REJECT DIETING! 

Food and I have had a tumultuous relationship. Most of my young life, I ate what my mother served. As one of seven children, we looked forward to every meal. My Mom made it work. Feeding a family of nine most nights was a feat in itself. We never over ate - there wasn't surplus food after any meal. Leftovers? What were they? We always had enough and it was always delicious, if not simple and utilitarian at times. My mom served basics like spaghetti with marinara or meat sauce and an iceberg salad. Meatloaf and roasted potatoes. Tuna Casserole. Goulash (we called it Beefaroni). Roasts were for Sunday dinners or holidays, and there were memorable holiday meals. We enjoyed simple desserts like Junket custard, Jello (with milk poured over!), Cool and Creamy pudding, or a Friehofer's fruit cookie. I remember loving sliced bananas with milk and sugar. And then there were the occasional treats - we all knew how to add and divide because it there was a box of 24 Popsicles, each kid got three. No more. 

My relationship with food got a bit more complicated when I became aware of my pre-teen body, when I developed fat in areas where it didn't previously exist. When you have six siblings, eyes are always on you and brothers can chime in when, perhaps, they should not. I remember one family drive where we approached a bridge where a sign read "Weight limit, 10 tons" and one brother yelled, "Stop! Jeannie has to get out." Ouch. I have long since forgiven him, because he IS a wonderful grown-up brother, but that moment, and others, planted a seed that fully sprouted into a lack of confidence and self-doubt. I actually was thin then, but knew I was fat. Then, I started taking note of everything I should and should not be eating, and I thought everyone else noticed, as well. Here I am, still stung by those words.

Thinking about food constantly had other side-effects. I became obsessed with creating food that was different than the trusted meals and desserts my mother served. My sister Patsy gave me a little metal recipe box for my 12th birthday (I think it was 12) and I started clipping recipes from all of my mother's "women's" magazines before she even had time to read them! I got in a bit of trouble for that. But my recipe box filled up, and I still have it to this day. My Mom indulged my new interest and supported my baking and cooking. The added benefit was that our family enjoyed home-made desserts. 

That obsession with food was at the same time I started dieting. My first diet was one where I started eating Swiss Miss yogurt. Yogurt was fairly new to the market where I lived and was almost seen as an exotic health food. I am sure it wasn't, but I managed to get through high school ranging between 115 and 120 pounds. Once I started dieting my weight climbed about five pounds a year, steadily, which became a yo-yo cycle of instability and more self-doubt. I'd diet on Monday. I'd diet on the first day of the month. The first day of the year. For Lent. I'd diet for the upcoming summer. For a fall wardrobe. For a class reunion. Before getting pregnant. After a baby. From Halloween through New Years Day - what a miserable time to deny myself! I dieted ALL THE TIME and the weight kept creeping back and then some. My self-confidence was crushed as I placed so much personal value on the scale. It was indeed a vicious cycle, one which I am afraid imprinted my daughters (and for which my older, wiser self apologizes.)

Finally, now that I am beyond my mid years and am into my later years, after having tried so many diets to become the me I always felt I was supposed to be, I have had a revelation. My personal value is NOT tied to my weight. I am not in search of a vain goal. My goal at age 67 is to have the healthiest next phase as I can. I've tried all these: I am not a Weight Watcher (WW); I am not plant-based (though I love plants); I am not Keto which for me is not sustainable. I am not Vegan, though I tried that too. I have learned that all or nothing in any circumstance does not work for me. The imprinted middle-child in me is much too rebellious. You tell me 'no?' I'm going for it. So, I have come to terms that I am not a dieter. I am an eater, and I choose to eat foods that are good for me. If I have an occasional treat, I accept that and move on. I am a baker, for goodness sake! So, my practice is: low carb as possible, lots of color, tons of water, iced coffee whenever I want it, healthy protein, lower fat options, and a spoonful of ice-cream if my body tells me it's necessary. For me, dieting is about denial and failure. Eating is about putting good things in my body that not only nourish but bring joy, especially when consumed with friends and family.

At this time of year, when some of us may dread navigating upcoming holiday meals and what we will 'allow' ourselves to eat - let go, just a little bit. Have a bit of this, some of that, and allow yourself the true pleasure of partaking of food traditions that mean a lot to you. It's no fun to leave a holiday feast regretting that you didn't enjoy it as much as you might have.  Feed your body and your soul! And take a walk for you, not for steps or your smart watch or a spreadsheet. Walk to see the night sky, breathe in the fresh air, clear your head. Everything doesn't have to be measured data to tell you you did a good job. 

I will continue to bake, to show it off, to eat delicious meals, to pay close attention to my health 'numbers' and to act accordingly. Giving myself permission to reject dieting is a healthy way for me to take control of my healthy and happy future. 

PLEASE comment below if any of this resonates with you.

XO,

Jeannie

The Adirondack Baker 


Photo credit

Sunday, November 14, 2021

Old-fashioned Baked Egg Custard

BAKED EGG CUSTARD


Old-fashioned baked egg custard
is a comfort food that brings back memories of childhood. I used to make it for my children. It is simple, delicious, and soothing all at the same time. My son used to request it when he was a little boy. Making it again yesterday was reliving a happy memory. With just a few ingredients, it blends together quickly and bakes in a water bath in the oven. The most difficult part about this recipe is waiting for it to cool! It needs no embellishment, no fruit, no whipped cream. It's perfect all on its own, just the way it is. It makes a great breakfast or brunch dish as well - eggs, milk, slightly sweet. What a terrific way to start (or end) the day!

Baked Egg Custard - serves four

Preheat oven to 350 degrees Fahrenheit

Spray or lightly butter 4 standard-sized ramekins or custard cups (you may have enough for 5)

Have a larger pan ready that can fit the ramekins within

Ingredients:

2 cups whole milk

2 eggs

1/4 cup sugar (or equivalent sweetener of choice)

1 tsp. vanilla extract

A dash of salt

nutmeg for sprinkling

Directions:

Beat eggs with sugar and vanilla. I used my Ninja blender to do this but you can use a mixer or whisk.

Scald milk but don't let it come to a boil - when tiny bubbles appear on the edge of the pot, remove from heat. 

Take 1 cup of the hot milk and gradually blend into the egg mixture to temper the eggs. 

Pour the tempered egg/milk mixture back into the rest of the scalded milk. Mix thoroughly.

Place ramekins in pan. Divide custard among ramekins and sprinkle tops with nutmeg.

Pour hot tap water halfway up the pan being careful not to get water into the custard.

Carefully place pan in preheated oven (careful, it is heavy).

Bake 30-40 minutes or until knife inserted in center of one of the custards comes out clean. 

Once the pan has cooled a bit, remove ramekins and let sit for a while. 

Now the hard part - wait while the custard cools in the fridge!

Alternately: you can bake one large custard in a casserole dish - bake for about an hour. 

Do you have a memoryof a favorite childhood dessert? Please share in the comments below!


Friday, November 12, 2021

A Nice Collection of ADK Baker's Thanksgiving Recipes


Last night I was thinking that, rather than reinvent the wheel, I would did into past blog posts to bring you a few great recipes for Thanksgiving. And at the end, a glimpse into the Thansgivings we experienced growing up - such happy holidays for all nine O'Farrells!


Be sure to open each link for not only the recipe, but the memories which are just as delicious! 


Pumpkin Whoopie Pies!


1.  Fool-proof Make-Ahead Gravy, thanks to Jody Shepson! 

http://adirondackbaker.blogspot.com/2009/11/fool-proof-make-ahead-gravy-and-easier.html


2. Mashed Potato Casserole

http://adirondackbaker.blogspot.com/2009/11/mashed-potato-casserole.html


3. Cornbread Casserole

http://adirondackbaker.blogspot.com/2010/11/enter-holidays-and-kathryns-cornbread.html


4. Roasted Butternut Squash Mac 'N Cheese

http://adirondackbaker.blogspot.com/2013/11/roasted-butternut-squash-mac-n-cheese.html


5. Campbell's Green Bean Casserole

http://adirondackbaker.blogspot.com/2012/11/campbells-green-bean-casserole.html


6. Pumpkin Whoopie Pies!

http://adirondackbaker.blogspot.com/2009/11/whoopie-pies-pumpkin-style.html


7. Pumpkin Swirl Cheesecake

http://adirondackbaker.blogspot.com/2009/11/pumpkin-swirl-cheesecake-with-ginger.html


8. Pumpkin Walnut Fudge

http://adirondackbaker.blogspot.com/2013/11/pumpkin-walnut-fudge-for-thanksgiving.html


9. The Morning After - Stuffing Cakes

http://adirondackbaker.blogspot.com/2012/11/the-morning-after-stuffing-cakes.html


10. Memory of my childhood Thanksgivings!

http://adirondackbaker.blogspot.com/2009/11/thanksgivings-past.html


I would LOVE to hear comments, so please add your thoughts below! And be sure to use that search bar on the left for any recipes you don't see here. There are a lot of them!


Wednesday, November 10, 2021

Gifting Half-a-Batch of Chocolate Chip Cookies


I love to gift food. Yesterday morning I got up early, before work, to make chocolate chip cookies for my co-worker Lisa's birthday. Her birthday was last Friday but she took the day off, and then there was the weekend, and then Monday we treated her to lunch but I forgot to bake! So, early yesterday I made a half-batch of chocolate chip cookies, boxed them up, and delivered them to her office. (Note: the box pictured is actually a pie box, ordered from Amazon, perfect for a half-batch of cookies!). 

Previously, I asked Lisa what her favorite baked thing is. She replied that it's chocolate chip cookies. I asked if she liked them crispy or chewy, and she said "I've never met a chocolate chip cookie I didn't like!" Knowing I didn't need to make a full batch to create a nice gift, I halved my regular recipe. Halving this recipe yields about 2 dozen, perfect to fill a gift box or your cookie jar. 


Here's the recipe: 

HALF-BATCH CHOCOLATE CHIP COOKIES 
Preheat oven to 375 degrees Farenheit 
Line cookie sheets with parchment paper 

Mix together: 
1 softened bar (4 oz.) unsalted butter  (room temperature)
1/2 cup light brown sugar 
1/4 cup granulated sugar 
Whip that together until light and fluffy. 

Add: 
1 egg 
1 tsp. vanilla extract 
Beat well. 

Lightly stir together and add: 
1 cup plus two tablespoons all purpose flour 
1/2 teaspoon baking soda 
1/2 teaspoon baking powder 
1/2 teaspoon salt

Stir in:
1 cup semi-sweet chocolate morsels 

I use a small cookie scoop but you can use a spoon to distribute about a tablespoon of dough per cookie, about 2-inches apart. I get 12 to a cookie sheet. 

Bake for 8-9 minutes, checking to see that the outer edges are beginning to brown but the centers are just about set - still light in color but no longer wet. Sometimes I add another minute to get there. I bake two cookie sheets at a time. 

Cool on cookie sheets for about 5 minutes and then remove from pans to wire rack to cool completely. 

ENJOY! 

PS - Dear readers: if you share this post with your friends, I will greatly appreciate it! I am working to get my readership back to previous levels. That will take some time, I understand, but a little boost will certainly help. Thank you! 

Wednesday, November 3, 2021

Easy No-Knead Sourdough Bread

EASY NO-KNEAD SOURDOUGH BREAD!


My baking friend Matt Kopans shared this super easy no-knead sourdough bread recipe, and it changed my bread-baking life! There's no yeast, just a few ingredients, and only a few steps. 
Like many people, my sourdough journey started in the early days of the Covid-19 pandemic. It was March 2020, and I heard Deanna Fox on WAMC's Food Fridays program. She was talking about the process of making a sourdough starter and baking bread. I was hooked. I looked her up on Facebook and signed up for her on-line Sourdough Bootcamp. My starter and I were on our way. 

Many pretty loaves of sourdough later, my friend Matt posted a picture of a beautiful loaf of no-knead sourdough bread, something he stirs together at night and pours into a loaf pan in the morning. Simple as that. So, I enthusiastically asked for the recipe and Matt graciously shared.

For measuring (for the most part) I use a digital food scale and if you don't have one, I encourage you to get one. I got mine for about $15. Worth its weight in gold. (How did I ever get by without one for six + decades?)

Directions: The night before or at least 8 hours in advance, in mixing bowl weigh (if you don't have a food scale you can look up measuring-cup equivalents online): 

  • 450 grams all-purpose flour
  • 350 grams un-chlorinated water (I fill a jug/pitcher and let it sit out for a day and the chlorine dissipates)
  • 10 grams salt
  • 2/3 cup (not weighed, just measured) discarded and unfed sourdough starter. After you take this out, it's a good time to feed your starter. NOTE: if you do not have sourdough starter, ask around. It's been such a phenomenon I bet you have a friend within six degrees who will share a cup. Or, you can order it from King Arthur Baking Company.

Mix well. I use a Danish whisk which is also great for mixing other batters - brownies, pancakes, things you don't need to pull out a mixer for. 

At least 8 hours later or next morning:

Place a cake pan full of water in the bottom of your oven. This provides a moist environment for a softer crust. 

Preheat Oven to 450 degrees Farenheit

Grease/spray loaf pan. Mine is a 9x5 with straight sides. Makes great slices for toast/sandwiches. 

Pour dough into pan.

I sprinkled Everything but the Bagel seasoning from Aldi's on top but a naked loaf of bread is beautiful, too. 

Bake for 45 minutes. 

Cool on rack for 10 minutes. Turn out of pan to cool completely. 

Happily cooling and looking pretty!

Thanks so much for the warm embrace as Adirondack Baker enters its second act. It is an honor to share recipes with you! 

Thursday, October 28, 2021

Oatmeal Cookies Deserving of a Pedestal!

LOADED OATMEAL COOKIES

Even though it's only been a day since my first post in revitalizing this blog, I am motivated to write another because I made these cookies last night and they came out great! These are for Russ, my very own, grown adult Cookie Monster! He LOVES oatmeal cookies. 

If you've ever purchased the cylinder of Quaker Oats, you'll notice that under the lid is the recipe for their famous cookies. It's my favorite basic oatmeal cookie and bakes up crispy on the outer edges and soft on the inside. I make these often. So don't throw that lid away! Mine is tucked into my cabinet so any time I want to make them, it's there regardless of what brand of oats I have on hand. 

Below is my adaptation of Quaker's original recipe:


LOADED OATMEAL COOKIES

Makes approximately 4 dozen average sized cookies or 2 dozen large cookies

Preheat oven to 350 degrees Fahrenheit. Have ungreased cookie sheets ready (or line with parchment).

Ingredients:

14 tablespoons of soft butter (I use unsalted)

3/4 cup light brown sugar

1/2 cup granulated sugar

2 tsp. pure vanilla extract (I double the 1tsp. to 2, because I love it)

2 eggs

1 1/2 cups all purpose flour

1 teaspoon baking soda

1 teaspoon cinnamon

1/2 teaspoon salt

3 cups oats - quick or old-fashioned (not steel-cut)

1/2 cup raisins

1/2 cup dried cranberries

1/2 cup chopped walnuts

1/2 cup chocolate chips (I use mini)

1/2 cup shredded coconut

Directions: 

In large mixing bowl or the bowl of your stand mixer, beat butter with sugars and vanilla until thoroughly incorporated, scraping the bowl as necessary. Add eggs, one at a time, beating well after each addition. To this, add flour, baking soda, cinnamon, and salt. Mix well. Add oats and mix or stir in till evenly distributed. By hand, stir in raisins, dried cranberries, walnuts, chocolate chips, and coconut. This is a workout so use your heaviest wooden spoon and get in there!

I used a spring-loaded ice-cream scoop to make large cookies and fit 6 on a half-sheet baking pan. Then I squished them down a bit to level them out. If you want to make smaller cookies, you'll get a lot out of this batch using a small cookie scoop or a tablespoon. (You can also half the recipe if you want. I do that all the time, less of a commitment!) With this batch, I made 16 large cookies and still had a lot of cookie dough left so I froze that for Russ's next visit.

Bake for 12 minutes (+/-) for large cookies or 8-10 minutes for smaller cookies. You want to look for brown edges but still light, moist centers. If it looks wet in the middle, give them another minute or two. Crispy brown outer edges, light, moist centers. Your individual oven will behave differently than mine, so you just have to watch it. They take as long as they take. 

Let cookies rest about 5 minutes or so, and remove them to a wire rack to cool completely.

These cookies were so large they didn't fit in my cookie jar, so I put them on a pedestal!

Deserving of a pedestal!

If you'd like to see previous cookie posts from ADK baker, click here: http://adirondackbaker.blogspot.com/search?q=cookies


Wednesday, October 27, 2021

Back in the Saddle! With a small cheesecake recipe you'll love!


Hello my friends! 

Welcome back! It's been a long while and much has happened since I last posted. With an eye toward the future, this blog is back in action. I will be posting regularly, something I have greatly missed and look forward to! I am committing to at least once a week, on Wednesdays, if not more. 

First of all, I want to thank all of you who've followed my posts and who come back, again and again, for recipes you've grown to love. The blog has remained active even though I hadn't been posting, which warms my heart. You may notice, it's had a facelift. 

It's probably time for a re-introduction. Here are the stats:


Jeannie O'Farrell Eddy, blogger, Adirondack Baker (adirondackbaker.blogspot.com)

I am a true boomer - born in the mid-50s and grateful for growing up in the subsequent decades. As one of seven siblings, I learned the value of family as community early on. 

Still working full-time, I am looking forward to retirement next spring so I can spend more time baking, cooking, writing, and enjoying time with my favorite people! 

I am a Mom and Grandma and spend a lot of time with kids and grandkids. 

My 'boyfriend' Russ and I just marked 24 years together, long-distance! He lives in Central New York and I live in Glens Falls, New York in a 121-year old bungalow that is my Shangri-la. It's about a 4-hour drive and we see each other at least a couple of times a month. He's my guy for life. I guess 24 years is proof of that!

This blog began as part of my master's thesis. I graduated from Skidmore College as an adult in 2003 and earned my masters in 2009. My masters thesis was on relationships in the kitchen and how they've evolved with the advent and advancement of technology. It was a fascinating topic to research, starting with outdoor kitchens that moved into the home, with sinks, stoves, the first appliances, cabinets, etc. all the way to today's modern, tricked-out kitchens. I read many food anthologies and researched old catalogs. I came to learn that food is so much more than something we consume. It is relationships. It is tradition. It is community.

With that in mind, I am welcoming YOU back to my blog, and I can't wait to get started, again!

Thank you!

Jeannie

And (drum roll...) here's the first recipe for Adirondack Baker, second shift! It's a small cheesecake and goes together so easily. I think you'll love it! 

Small Cheesecake (serves 6-10)

Preheat oven to 325 degrees Fahrenheit - Prepare 8" round springform OR regular 8-inch round cake pan (cake pan set-up directions below).

CRUST:

2 cups graham cracker crumbs (if you don't have graham cracker crumbs, you can use any dry cookie. I actually used Cinnamon Life Cereal in a pinch!) 

1/4 cup sugar

4 tbsp. melted butter

CHEESECAKE FILLING:

1 lb. cream cheese (two blocks, room temperature)

1/2 cup granulated sugar

2 eggs

2 teaspoons pure vanilla extract

1/2 cup sour cream

Pan set up: spray spring form pan with vegetable spray. If using 8-inch round pan, cut a circle out of cardboard, just a bit smaller than 8-inches. Cover in foil. Before placing it inside the pan, make a sling of a folded length of foil, about 3 inches wide and long enough to hang over the side of the pan. Insert sling into the bottom of the pan with ends going up the side and over, outside the pan. Then drop the foil-covered cardboard (smooth side up) into the pan and press down firmly. Spray bottom and sides with vegetable spray.

If using a spring form pan, wrap the outside and bottom tightly with foil and place on cookie sheet.

Make crust: Mix in food processor or blend with fork - graham cracker crumbs, sugar, and melted butter. Press into bottom of pan and up the sides a bit if you have enough.

Bake crust, alone, for 10 minutes in preheated oven.

Meanwhile, mix filling:

To large mixing bowl, add soft cream cheese (must be soft or you'll have lumpy cheesecake) and sugar. Beat very well, scraping bowl as you go. Add vanilla extract and mix till incorporated. Add eggs, one at a time, beating well after each addition. Finally, mix in sour cream until very smooth. 

When the crust comes out of the oven, let it sit for a minute then add the filling. Smooth top with a spatula.

Place a pan of water on the floor of your oven. This provides moisture that prevents the cheesecake from cracking. I use another cake pan and fill it about half way up. Be careful - it may splash. 

Place cheesecake on center rack of oven.

Bake for one hour. Turn oven off. Crack door open (I use a pot holder)and let sit for another hour. 

Let cool and then refrigerate. 

(Is that a pretty cheesecake, or what?)


Thank you for your support, and I hope you enjoy the revival of ADK Baker! Please comment below and let me know what you'd like to see in the future. Coming up are baked apple cider doughnuts, pumpkin whoopee pies, key lime pie, crock pot beef stew, and kitchen sink chocolate chip cookies. And more, and more, and more! 


MORE ADK BAKER CHEESECAKE RECIPES HERE: https://adirondackbaker.blogspot.com/search?q=cheesecake


Monday, September 10, 2018

Keto crust recipe for a REAL pizza!

I wanted pizza - desperately. Despite continuing to bake a lot for other people (!) since July I have been following the Keto way of eating. It's a LCHF lifestyle (low carb/high fat) which to many seems counter-intuitive, but for me it's been transformative. My blood sugar levels have improved dramatically, and I've lost an impressive bunch of pounds. I eat delicious food, and seriously have very few cravings, though I thought pizza was out of my life forever. But it's not! I've found a wonderful recipe for a Keto pizza crust which uses shredded mozzarella cheese, cream cheese, an egg, and some almond flour. That's it. (see link at bottom of post for a number of sources). I had toyed with the idea of making my own cauliflower crust but it is WAY too work intensive, and the manufactured versions have all kinds of carbs from different types flours. Manufactured cauliflower crusts are a great resource for the gluten-free market but not for those of us living on a minimum of carbohydrates.

Last night I made my first Keto crust and I was floored - it is an amazing substitute for a yeasted pizza dough. The mozzarella cheese provides the same elasticity as a yeasted crust. The real key is to par-bake the crust for about 10 minutes so it has the structure to support the sauce and toppings which will bake for an additional 10 minutes. I cut it into 4 slices and two were plenty. I gave the other two to my neighbor Suzanne and she loved it!

Here's the recipe:

Keto Pizza Crust Recipe
(pre-heat oven to 425F)
makes enough for one approx. 10-inch round (or similar-sized rectangle) pizza. Can be doubled for a larger pizza.

Ingredients:

Crust:
1 1/2 c. shredded mozzarella cheese
2 oz. full-fat cream cheese (1/4 of a standard 8 oz. block)
3/4 cup almond flour (can be found in bulk bins at grocery stores and health food stores)
1 egg

Sauce:
Low carb pizza sauce: I used Rao's which is 3 carbs per 1/4 cup, some have more but still, for a whole pizza it's negligible. Rao's is comparatively expensive but tastes great. At $4.99, you still get 4 pizzas out of a jar, which is pretty reasonable.

Toppings of your choice including:
1.5 cups of more mozzarella cheese
A sprinkling of grated parmesan
A little dried oregano if you have it
Then, whatever you want!


Prepare pan:
Line baking pan with parchment paper. Spray lightly with oil

In large microwave-safe bowl, melt shredded mozzarella cheese with cream cheese for one minute.
Stir.
Microwave for 30 seconds more. Remove from microwave.

Vigorously stir in almond flour and egg until a soft dough forms. Mix as well as you can. It will be a "spotty" dough with areas of cream cheese and almond flour. Just do the best you can. It comes out fine.

Dump out onto parchment paper on baking pan.

THIS is the interesting part. Your hands have to be WET to spread this properly and so it won't stick to your hand. I used a small bowl on the side and immersed my palm in the water, and then patted the dough into shape, dipping my hand into the water often. Don't let it get too thin but spread it to the size you want. It's pliable and you can work with it. I made a rectangle about 8x11 but you could get a good 10-inch circle too.

Once your dough shape is formed to your satisfaction, place pan on center rack of preheated 425F oven and set timer for 10 minutes. You want some light browning to happen.

Remove crust from oven and spread 1/4 c. pizza sauce. It doesn't seem like much but it's plenty for a small pizza. I then sprinkled grated Parmesan and a few flakes of dried oregano.

Toppings go on top of that - first, the shredded mozzarella cheese. I used pepperoni (see photo) but plan to make the next one with thinly sliced mushrooms, green pepper and Vidalia onion. (Can't wait!).

Bake pizza for 10 minutes more at 425F.

Remove from oven. Let it sit a minute or two. Cut.

1/4 pizza crust is 4.5 grams carbs, 4.5 grams protein per myfitnesspal.com app

Inspiration source:
https://duckduckgo.com/?q=fathead+pizza+dough&atb=v120-3&ia=recipes


Monday, July 23, 2018

Cape Cod Chocolate Chip Cookies!

CAPE COD CHOCOLATE CHIP COOKIES

I wish I could say this recipe evolved from a wonderful experience enjoying these cookies on a vacation on the Cape, but no. This is a recipe I made up in my head and then executed last week for my regular Weekend Platters that I deliver to friends in the area. Happily, it was a success first time out! This is a chocolate chip cookie recipe with the additions – to make it Cape Coddy - of dried cranberries and crushed Cape Cod Potato Chips.

They were a HUGE hit for all who tried them, especially my BF Russ who is a die-hard oatmeal raisin cookie fan (you'd never know his fondness for cookies by looking at him - he's 6'4" and no body fat!). He loved these so much he ate 8 of the remaining large cookies over 3 days this past weekend. He took the last one “to go” when we said good-bye on Sunday 'til the next time. It’s a good thing he did or I would have devoured it the minute he drove away!

Last Weekend's Platter: these cookies, banana bread muffins, blondie bars, and blueberry scones! 


CAPE COD CHOCOLATE CHIP COOKIES

Preheat oven to 375 degrees F
Line baking sheets with parchment paper
Have a ¼ cup measure or ice cream scoop ready for portioning out cookies

Ingredients:
(makes about 24, 4-inch cookies) 

12 tablespoons soft unsalted butter, a bar and a half
4 tablespoons solid vegetable shortening (I know, but it is a small amount and provides a necessary light quality)
1 cup light brown sugar, packed
½ cup granulated sugar
1 teaspoon pure vanilla extract (I use vanilla bean paste, pricey but worth it)
2 large eggs

2 ¼ cups all-purpose flour
1 teaspoon baking soda
1 teaspoon salt

1 cup semi-sweet or darker chocolate chip morsels
¾ cup dried cranberries (I used a 6 oz. pouch)
1 cup coarsely crushed Cape Cod Potato Chips (regular flavor) – I put chips in a quart-sized zip bag and hit it a few times with a rolling pin to about ½ inch sized pieces so they don’t get lost in the dough.

Directions:
In large mixing bowl, cream together butter and shortening for a minute or two.
Add both sugars and mix very well until light and fluffy.
Add vanilla and mix well.
Add eggs, one at a time, beating well after each addition.

In separate bowl, stir together flour, baking soda, and salt.
Slowly add flour mixture to butter mixture until well mixed.

Stir in chocolate chips, dried cranberries, and crushed potato chips.

Using a levered ice cream scoop or ¼ cup measure, portion out dough on parchment-lined cookie sheets or baking pans. Leave a couple of inches between cookies, and squash each portion down a bit with a couple of fingers to flatten them out so they bake evenly. I get 8 cookies per standard cookie sheet.  You can reuse the parchment paper for the next batch.
Note: I keep two racks in the center of the oven, one just a few inches above the other. I bake two pans at a time and rotate them with about 3 minutes to go. This may seem a little OCD. If you don’t want to do that, just bake one pan at a time in the center of the oven.

Set timer for 10 minutes and check. What you want to see is a browning beginning around the edges and the middle still looks pale but not wet (see photo above). I always have to add a minute or two but it depends on your oven.


Cool pans on rack for a few minutes and then move cookies to racks to cool completely.  They can then be stored in an air-tight container or zip bags.