Friday, December 30, 2011

For New Year's Eve: Killer Chocolate Cheesecake

This recipe for chocolate cheesecake is adapted from one I found on Epicurious.com, with a few changes.  It's a "deep, dark" chocolate cheesecake with a chocolate crumb crust and a layer of chocolate ganache as its crowning glory.  (The English major in me knows it's wrong to use the word "chocolate" three times in one sentence, but I can't help it!)  Their version suggests the use of 70% chocolate and expensive cocoa, but you can have fantastic results with Hershey's semi-sweet chocolate as well as Hershey's cocoa.  It's so deeply, darkly chocolate that a small sliver will do.  Make it ahead and take it out of the fridge a couple of hours before serving to maximize the flavor experience.  I'm making it tonight!

KILLER CHOCOLATE CHEESECAKE
Oven 350 degrees F

Crust
24 chocolate wafer cookies (from one 9-ounce package), crushed into fine crumbs
1 tablespoon sugar
1/4 cup (1/2 stick) butter, melted

Filling
1 3/4 cups semi-sweet chocolate chips
4 (8-ounce) packages cream cheese, room temperature
1 1/4 cups sugar
1/4 cup unsweetened cocoa powder 
4 large eggs

Topping
3/4 cup whipping cream
3/4 cup semi-sweet chocolate chips


Crust:
Preheat oven to 350°F. On lowest oven rack, place a baking pan filled with hot water.  This will act as an indirect water bath and will help to minimize cracking.  Cheesecake will bake on center oven rack.

Butter 9-inch springform pan. Mix cookie crumbs with butter and press crumbs evenly onto bottom only of prepared pan. Freeze for 10 minutes while preparing filling. 

Cheesecake:
Melt chocolate in metal bowl set over saucepan of simmering water, stirring until melted. Don't let water hit bottom of bowl.   Take off heat and cool chocolate until lukewarm but still pourable. 

In large mixer bowl, bllend cream cheese, sugar, and cocoa powder until smooth. Blend in eggs, one at a time. Add  lukewarm chocolate. Pour filling over crust; smooth top. 

On center oven rack, bake until center is just set and just appears dry, about 1 hour. Cool 5 minutes. Turn oven off and prop door open.  Let cheesecake remain in oven for an hour.  Run knife around sides of cake to loosen. Chill completely before adding ganache topping.

Ganache topping:
Stir cream,  and 3/4 cups chocolate chips in heavy medium saucepan over low heat until smooth. Cool slightly. Pour over center of cheesecake, spreading to within 1/2 inch of edge.. Chill at least1 hour.  Cover with foil and keep refrigerated.

Release pan sides. Transfer cheesecake to platter.  Let stand 2 hours at room temperature before slicing.

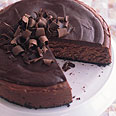
Photo credit:  Epicurious.com's Deep Dark Chocolate Cheesecake

Thursday, December 29, 2011

Chunky Pineapple Upside Down Cake

For my son-in-law Bill's birthday this year (35!), I made his traditional favorite: pineapple upside down cake.  I added a twist to it this year by using chunk pineapple (canned) and almost a whole jar of maraschino cherries.  I also made this cake more of a pound cake, unlike the usual basic yellow cake.  This cake is a cinch to make, and so delicious.  It holds birthday candles well, though Henry beat Bill to it and blew out the candles before his daddy had a chance!

Here's my recipe, which, if you taste it, might become yours too!

CHUNKY PINEAPPLE UPSIDE DOWN CAKE
Oven - 350 degrees F, preheated
10" round cake pan, deep sides (3") or 13 x 9 pan, spray bottom with cooking spray

1 bar butter, melted
1 cup brown sugar
1 standard sized can of pineapple chunks in juice, drained; juice reserved for cake
1 yellow cake mix
1 box instant vanilla pudding mix
4 eggs
1/2 cup vegetable oil
pineapple juice plus water to equal 1 cup liquid
small jar maraschino cherries, out of the juice

Whipped cream

Directions:

Pour melted butter into prepared pan.  Sprinkle brown sugar evenly over butter.  Press down with fork to moisten sugar and make sure it is distributed evenly.  Place pineapple chunks evenly over brown sugar/butter mixture.  Sprinkle maraschino cherries among the pineapple chunks.  Set aside.

In large mixer bowl of electric mixer or with hand-held mixer, slowly mix all cake ingredients:  cake mix, pudding, eggs, oil, juice and water.  Once incorporated, beat ingredients for about 3 minutes.  Pour cake batter evenly over pineapple and cherries, leaving enough head-room for cake to rise.  If you have too much batter, save it for a little cake or some cupcakes.

Bake for 45-50 minutes OR until top bounces back when lightly pressed and toothpick inserted in center comes out clean.  Remove from oven and let cake sit for 10 minutes.  Turn out onto serving platter.  Can be served while still warm with a spritz of whipped cream.

Heavenly...

Tuesday, December 27, 2011

Lemon Pound Cake

On Christmas Eve, I brought a lemon pound cake to my friends Diane and Bob Loviza.  They were incredible hosts and put out an amazing buffet, including many pans of delicious lasagna with salad, bread, and all kinds of nibbley food and desserts.  Today, their daughter Tina asked me to post the recipe for the pound cake which was my contribution to the evening.  She loved it, and it is remarkably easy, so I am posting the recipe here.


LEMON POUND CAKE
preheat oven to 350 degrees Farenheit


Prepare bundt cake pan (grease and flour, or spray with cooking spray)

In large mixing bowl, with electric mixer on slowest setting, mix:

1 lemon cake mix
1 package instant lemon pudding mix
4 eggs
1/2 cup vegetable oil
1 cup water

Mix until all ingredients are moistened, turn mixer to medium high speed and beat until thoroughly combined and batter is thick.  Scrape sides and beat again for a few seconds.

Pour batter into prepared pan.  Bake for 45 mintues to one hour, depending on your oven.  Cake is done when top springs back when lightly pressed, or toothpick is inserted and comes out clean.

Cool for 15 minutes in pan.  Turn out onto cooling rack.

When cake is completely cooled, drizzle with lemon glaze (1/2 cup confectioners sugar, 1/2 teaspoon lemon extract, and enough water - a teaspoon at a time - to make a runny glaze).  After glaze sets, dust top with a sprinkling of confectioners sugar.

Tuesday, December 20, 2011

A Whole Lotta Baking Goin' On

My kitchen is doing overtime as baking central.  Tonight alone, I'm baking brownies for a co-worker's birthday, a birthday cake to be frosted and decorated tomorrow night, a Grand Marnier pound cake (and a couple of little pound cakes), cinnamon rolls to freeze for friends who'll bake them themselves Christmas morning,  and before I go to bed, there'll be yet another batch of peppermint bark.  This is nothing.  Tomorrow night, I'm baking a whole slew of pound cakes to deliver to friends on Thursday. The star of the show, tonight, is the Grand Marnier pound cake.  My version of the recipe follows (adapted from many, including a recipe from the 70s, the "Harvey Wallbanger" cake). This cake is great, a dense pound cake infused with Grand Marnier (or Triple Sec if you have it).  Pound cakes in general are very good things...

GRAND MARNIER POUND CAKE
oven - 350 degrees F

Makes 1 bundt pan or 2 loaves

Grease and flour pan(s) or spray with baking spray

Ingredients:
1 yellow cake mix (white is fine as well)
4 eggs
1 package instant vanilla pudding (4 serving size)
1/2 cup vegetable oil
1/2 cup orange juice
1/2 cup Grand Marnier

In large mixer bowl, slowly mix all the ingredients.  Turn mixer to medium speed and beat until all ingredients are thoroughly combined and the batter is thick and smooth.  Pour batter into pan(s) and bake until cake tests done (top bounces back when pressed lightly) or toothpick comes out clean.  For a bundt pan,  bake 45 minutes to start and test for doneness, adding time if necessary.  Oven temps vary so bake according to your own oven's personality.

While cake is baking, make glaze:

1/3 cup Grand Marnier
1/3 cup granulated sugar
1/3 cup orange juice

Bring to a boil, reduce heat to lowest setting and simmer for 5 minutes, not a minute more.  Turn off  heat.  (Watch carefully, sugar can burn very easily, as I learned all too well in my last apartment as the fire department arrived just in time - catastrophe averted!)...

Cool cake 10 minutes, remove from pans and cool on cooling rack.  While still warm, brush glaze over top, twice.  When completely cooled, lightly sift confectioners sugar on top.

Sunday, December 18, 2011

In the Craziness, Old Ornaments Bring Peace

Christmas is one week away.  I don't have it all together these days, at work, in life, or even managing to relax.  I worry about everyone I love, I miss my California kid, and my still-to-do list is mostly unchecked.  There is always too much to do and not enough time to do it, so this morning, as I was going over that list of everything I think has to be accomplished today, I stopped.  Just stopped.  Instead, I took time to really look at the ornaments on my Christmas tree, and the decorations still randomly placed around my house (not  yet perfectly situated) and got caught up in the memories of Christmases past.  With that, a sense of peace came over me.

There's the Norman Rockwell ornament that was one of the very first collected in the early years, before kids.  There's Katie's first attempt at embroidery, and the ceramic angel, now missing one wing.  There's the tree-topper that's graced my tree since 1982, the one I made in a ceramics class and it has the kids' names etched on the bottom.  Then there's the Cabbage Patch ornament I made from a kit (made a lot of those!),  and Tricia's first stocking, in cross-stitch and barely completed in time, which hangs on my tree every year.  There's Meghan's nursery school construction paper bow with big red glitter, about 28 years old now (yikes!)...  I love the clothespin tin soldier one of the kids made at Greenfield Elementary School, looking its age, I'm afraid.  And the ceramic drummer boy, also made in  the same class that produced the tree-topper.  Each ornament has a story, and the ones that were once lost among the shiny manufactured ornaments are displayed with the most pride today.

These are a few of my favorite (Christmas) things!
(click to enlarge)

If you, like me, are caught-up in too many to-dos, stop and spend some time looking at the precious ornaments that you've treasured over the years.  I guarantee it will put things in perspective!

Have a great Sunday!

Tuesday, December 13, 2011

Twelve Days 'til Christmas

Every Christmas, I make a mental note to make a real note about all the things I'll do next Christmas to make it all simpler, easier, more enjoyable, with promises to trim this year's to-do list and spend my energies on things that really matter. I especially tell myself to enjoy the weeks leading up to Christmas, and not get lost in the myriad of self-assigned responsibilities that make that time go by too quickly without any real stopping to smell the Christmas tree.
Most of the people I know have already finished their Christmas and holiday shopping and are on to wrapping.  I haven't purchased one gift  yet, and I won't until this weekend.  It's my Saturday to work, and before I know it another week will have sped by and the pressure will be on.

As always, baking will take up a big chunk 'o time, but that's somehow restorative for me (and would be more-so if only the Elf on the Shelf would jump down and empty my dishwasher as I sleep!).

Here's a list of the things I still want/have to do over the next twelve days, until Christmas, and I wonder how many I will actually accomplish!:

Address Christmas cards.
Buy stamps for Christmas cards.
Mail Christmas cards.
Buy a ton of baking supplies.
Bake a ton.
Distribute the baked stuff.
Put ornaments on the tree that's been up with just lights for a week.
Call Meghan and send her birthday gift (a happy task)
Display my collection of ceramic Santas made from antique chocolate molds.
Finish my list and check it twice (for other people, not for me!)...
Buy gifts.
Wrap gifts.
Send gifts.
Go to the Irish store for no reason at all.
Read something spiritual and inspiring about the Nativity.
Buy a Christmas wreath for my naked front door.
Spend time with my kids.
Buy gift for Yankee Gift Exchange at work.
Decide what food to bring to office party.
Hang some garland and lights.
Make my entry way welcoming.
Bake some more.
Walk up and down Broadway in Saratoga Springs, with Henry if possible (to see his 3-year-old reaction to the beautiful lights and sights).
Spend as much time as possible with Hank and Pete.
Take lots of photos of  Hank and Pete.
Spend time with Russ.
Find time to have drinks with friends after work.
Find time for a weekend breakfast with friends.
Make a simpler list for next year, and choose a date now so that next year, I will finally manage to host a get-together in my own home and pull it off!


Photo Credit:  http://blogs.abc.net.au/.a/6a00e0097e4e6888330148c680be26970c-500wi

Sunday, December 11, 2011

A little break to visit a good friend...

Jan and Leila walking
along the Connecticut River
Yesterday, Saturday, I left for an overnight trip to Hatfield, Massachusetts to visit my friend Jan.  It's a trip I love to take, just about 2.5 hours from home, and a lovely ride through eastern New York and western Mass.  There wasn't much evidence of winter along the way, except for the colder temperatures, with the exception of the Stockbridge/Lee areas, where there was a good covering of snow, probably about six inches.  I was happy to take my new Jeep for its first real road trip, and it did just fine.

When I visit Jan, we usually pack a lot in to the 24 hours or so that I'm there.  We started out yesterday afternoon with a walk with her dog, Leila (10-year-old Golden Retriever), taking the trail behind Jan's home, along  the Connecticut River.  It's a gorgeous stretch of land and the scenery is completely unspoiled.  After our walk, we brought Leila home and then headed toward the mall in Amherst where we did a little shopping and then went to the movies.  We saw The Descendants with George Clooney, one of the very best movies I've seen in long, long time.  (Who couldn't watch George Clooney for a couple of hours, I ask you?!!!)...  Jan and I splurged and split a medium movie popcorn, despite all the health warnings against such an indulgence (it was SO good!), figuring that once every six months or so, it isn't going to do that much damage!  As we left the movie, I told Jan that it was one that I'll want to have for my own once it comes out on DVD.  We both loved it.

For dinner, we stopped at a seafood restaurant near Jan's house, Fish Tales, where she had a salad with grilled chicken and I had a filet of fish sandwich, which was really very good.

This morning, Jan treated me to a protein shake with strawberries and a cup of tea, and then we went to a food co-op where Jan is a member, and she bought a bunch of organic foods, including her favorite salmon cakes that she'll have during the week with pasta or salad.  I really admire the way Jan not only shops but eats.  She puts a lot of thought and planning into her menu, and I think she is rewarded with not only healthy but delicious meals.  I'm making a note to myself to follow in her footsteps!

Before I headed home, we took another walk with Leila, and I had my camera ready (big shocker!) to try to capture some of the beautiful light with my beautiful subjects, Jan and Leila. I also caught a few photos of Pearl, her calico kitty.  I had the best time with my friend, and I can't wait to visit her again.  On the Mass Pike heading west, I saw the sign that said "You are leaving Massachusetts.  Please come back soon."  to which I responded out loud "OK, I will!"

Pearl
Pearl through the sliding glass door -
with my reflection
blurring up the works!

My one-day get-away!  Click to enlarge...


Wednesday, December 7, 2011

Barilla's No-Boil Lasagna Recipe

Last weekend I decided to make a pan of lasagna, and for the first time used Barilla's no-boil lasagna noodles.  I thought it went together very well, and though I didn't keep the end result at home to try, believe it was well-received.  By not having to boil noodles, a cumbersome and somewhat messy step is completely eliminated.  I'm all for that.  The recipe is on the back of the Barilla no-boil lasagna ("Lasagne" on the box) noodles, but I'm providing it here as well.  I've read that you can do this with any lasagna noodle, but I wanted this to be just right, so I used Barilla.  I trust their pastas implicitly, and love how on different types the very reliable cooking time is right there on the front of the box.  Simple is better!

Many families traditionally serve lasagna during the holidays, so if you would like to save yourself a little work (this is still work, but not as much as the standard recipe), try this version.

BARILLA NO-BOIL LASAGNA NOODLES LASAGNA

1 box (16 sheets) Barilla No-Boil Lasagna Noodles
1 lb. ground beef or ground sausage, cooked to crumbless and drained (or half-and-half is what I did).  You could also use veggie crumbles.
2 jars Barilla Marinara sauce
2 eggs
4 cups shredded mozzarella cheese
15 oz. container ricotta cheese
1/2 cup grated Parmesan (or Parmesan Romano) cheese

I used a disposable foil pan because my lasagna was traveling, but if you have a deep rectangle casserole dish you can use that.  A 13x9 might need to eliminate one layer or it might spill over.

Brown meats and crumble as they cook.  Drain.

In medium bowl, beat two eggs, and combine with ricotta with 2 cups of the mozzarella and 1/2 cup grated parmesan.  Set aside.

Spray pan with cooking spray.
Layer 1:  Spread 1 cup of marinara sauce in pan.  Cover with 4 noodles, overlapping a bit as necessary.  Spread with 1/3 of the ricotta cheese mixture.  Layer half the meat over top. Sprinkle with 1 cup mozzarella. Spread 1 cup marinara over that.

Layer 2:  Cover first layer with 4 more noodles.  Spread with next 1/3 of the ricotta mixture.  Spread 1 cup marinara over that.

Layer 3:  Cover 2nd layer with 4 more noodles.  Spread last 1/3 of the ricotta mixture.  Layer last half of the meat over that.  Spread with 1 cup marinara.

Layer 4:  Cover 3rd layer with last 4 noodles.  Spread remaining marinara over top, completely covering noodles.  Sprinkle last 1 cup of mozzarella over top.

Cover pan with aluminum foil.  Bake at 375 degrees F for 50-60 minutes or until bubbling.  Remove foil and bake for another 10 minutes.

Let stand for half an hour before cutting.

Photo credit:  http://www.google.com/imgres?um=1&hl=en&sa=N&biw=1220&bih=634&tbm=isch&tbnid=F_XzKvG1HooK4M:&imgrefurl=http://www.familyoven.com/recipes/search%3Fterms%3DBarilla%2520No-boil%2520lasagna&docid=48wIsVqqT1D_hM&imgurl=http://familyoven-recipe-images.s3.amazonaws.com/160610-medium.jpg&w=200&h=175&ei=fAXgTvbFHqTh0QHoqNmgBw&zoom=1&iact=hc&vpx=347&vpy=177&dur=1017&hovh=140&hovw=160&tx=102&ty=48&sig=109143948364871047453&page=1&tbnh=136&tbnw=158&start=0&ndsp=16&ved=1t:429,r:1,s:0

Saturday, December 3, 2011

Mrs. London's, Saratoga Springs, New York

Today my friend Liz called to see if I'd like to join her and our friend Mary at Mrs. London's in Saratoga Springs.  When she called, Henry and I were on our way to Target in search of special new sneakers.  I told Liz that if she didn't mind my bringing a 3-year-old along, we'd love to join her.  She said, "You're talking to two Grandmas here."  Liz has two grandsons, just a bit younger than Henry and Pete, and Mary has a bunch of grandchildren, so  Henry was more than welcome.  Once Henry settled on the Spider Man sneakers (that light up with each step!) and we paid for them, we were on our way to Broadway and Mrs. London's to meet my good friends..

I ordered tomato cheddar soup and half a chicken salad sandwich on Rock Hill Farm farm bread (the very best bread I've ever had).  Both were outstanding.  I'm going to figure out how to make that soup and blog about it, soon!  Meanwhile, here are a few photos of our time at Mrs. London's today.  It was a lot of fun, and I'm very glad that Liz called!

Chicken salad sandwich on Rock Hill Farm bread, and tomato cheddar soup!
Henry and the disappearing gingerbread boy!

Thursday, December 1, 2011

Chocolate Chip Orange Cookies

I've been thinking about favorite flavor combinations (my favorites) and chocolate/orange keeps coming to mind.  I said to myself, "Why not add orange to my classic chocolate chip cookie recipe?" so that's what I did.  When he came for Thanksgiving, Russ brought a case of Florida oranges that he bought from the Lions Club.  They are almost the size of grapefruits, fairly thin-skinned, with a bright orange zest, the perfect subject for this recipe!

 Right now, in the oven, is the first batch of chocolate chip orange cookies.  The batter has the essence of one of those chocolate oranges that you can buy around the holidays, a ball of chocolate segmented like an orange.  I just love the orange infusion in that ball of chocolate.  So, I tweaked the standard recipe here and there, with the addition of fresh orange zest as well as a little bit of the spice-rack version, and the batter smells so fresh and citrus-y (is that a word?) and I can not wait to see how they come out!  I used to have a tiny bottle of orange oil that my son Jeffrey gave me, and would have happily portioned out a drop or two for this cookie, but it has long run out and a new bottle has not yet appeared in my pantry (hint, hint, Jeff!).  If you do have orange oil,  use it sparingly, as it is quite strong.  Because this recipe uses melted butter, the batter is almost caramel-like and the cookies are extra chewy.  Baked in a slightly cooler oven (350 degrees F), these cook through gently, creating a soft but substantial cookie. I hope you like them!  I know Henry and Peter will, gratuitous photo follows (!):


In their Christmas PJs...


CHOCOLATE CHIP ORANGE COOKIES
oven:  350 degrees F
makes 3 - 4 dozen cookies, depending on how big you make them (I got 3 dozen 3" cookies)

2 bars butter, melted over low heat, and cooled
1 cup brown sugar, light or dark (I used dark since that's all I had)
1/2 cup granulated sugar
1 teaspoon vanilla extract
1 tablespoon freshly grated orange zest
1 teaspoon dried orange zest (if you have it) or 1/2 tsp. orange oil
2 1/4 cups all purpose flour
1 teaspoon baking soda
1 teaspoon salt
2 cups semi-sweet chocolate chips

Orange sugar:  1/4 granulated sugar tossed with 1 tsp. freshly grated orange zest, mixed with fork until completely combined

Into cooled but still melted butter, stir in brown and granulated sugars.  Pour into mixing bowl.  To that, beat in 2 eggs, one at a time, the vanilla, and the orange zest.  Add flour, baking soda, and salt, and mix on low speed (or with wooden spoon) until completely combined.  Stir in chocolate chips.

On parchment-lined cookie sheet, drop dough by rounded tablespoonfuls 2 inches apart (I use a small cookie scoop and get 3 across, 5 down on a half-sheet pan).  Gently press each cookie with two fingers to level them out a little.  Sprinkle each with just a little orange sugar.  Use your finger to evenly spread sugar over top of cookie.

Bake for 12-14 minutes or until bottoms just begin to brown and top looses its wet look.

Remove pan to cooling rack.  After a few minutes, move cookies to their own cooling rack to completely cool.

Start to finish!  All but the eatin'!  (Click to enlarge)


Photos:  my own

Post script:  They're out of the oven, and they are incredible!!!!